E-Archive
Cover Page
in Vol. 12 - July Issue - Year 2011
Residual Stresses in Service

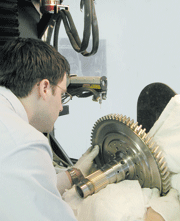
Measuring residual stress in a turbine disc using x-ray diffraction

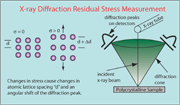
How XRD measures residual stress

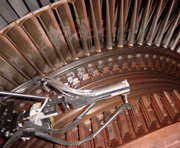
Measuring residual stress on an in-service turbine

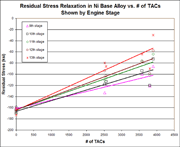
Stress relaxation
"Almen intensity" is the system used to specify and measure details of peening processes. The curvature of standard steel strips is used to draw a graph showing arc height for increasing peening time. There will be one time on the graph, "T", after which the arc height increases by 10% in a total peening time of twice T. The arc height at time "T" is known as the Almen Intensity or saturation point, the curve represents a single set of peening conditions for a unique peening machine. In most cases, the time required to peen a real part is determined separately, and is the time required to achieve a specified coverage, usually close to 100%. The peening times for Almen strips and parts are different because the parts are not usually made from the same material as the Almen strips, and so have different mechanical properties, including hardness, work hardening rate, etc., which in turn result in different size dimples from the shot impacts.
Introduction
The life of components in service may be ended by any of a wide variety of events and processes. Where the fracture of an individual component can cause secondary damage that will lead to a catastrophic failure of a structure or of a machine, the designer must take steps to prevent such a failure. First, he may introduce a protective surface treatment, for example shot peening to combat metal fatigue, or a paint to protect against corrosion. When physical steps are exhausted, he may limit the service life of those components. The determination of service life may be based on experience, component testing or analysis of test coupon data and mathematical models of the component in its service environment. Component testing is generally extremely expensive and time consuming, so it is normal to limit that activity to a few parts, to demonstrate the success of an analytical or experience-based approach. To be realistic, any analytical approach requires a proven understanding of the materials and processes used to manufacture the part, and especially of the events taking place during the service life of the part.
Components that are expected to live in hostile chemical environments or high temperature, high cyclic stress and high mean stress are candidates for the application of protective coatings and surface treatments to protect against stress corrosion cracking and fatigue crack initiation. Foremost among these protective treatments is shot peening, which introduces a compressively stressed layer on the peened surface. Elsewhere, protective, anti-oxidation coatings may be applied. These coatings frequently require freshly grit-blasted surfaces to enhance adhesion. These processes modify the original residual stress distributions, intentionally or coincidentally. Clearly, knowledge of residual stresses is essential in understanding the behaviour of components in service.
In this article, we will look at examples of the interactions of residual stresses with their operating environment and discuss ways in which measurements of residual stress in test pieces and components both new and after service, can be used to detect and understand the effects of excursions from the expected environment.
Peening
Shot peening is one of the most common and affordable surface enhancement methods. Shot peening puts a compressive residual stress near the surface of the part by causing non-uniform yielding. The yielding is tensile in nature, in the plane of the surface and close to it. Tensile yielding leaves a compressive residual stress when the force causing the load is removed. Yielding also work hardens the surface layer of the component, increasing the yield strength of the deformed layer. If the shot peening has been properly carried out, the most compressive residual stress is close to the elevated compressive yield strength of the work-hardened material.
a) Leaf springs
It is common for automotive leaf springs to be shot peened to extend their fatigue lives. Installed on the vehicle, the spring assembly is loaded in bending to support the weight of the vehicle; one face of each leaf is in compression and the other is in tension. When the vehicle’s wheel encounters a bump, the load on the spring is increased, and it bends elastically. The tension face of each leaf sees a higher tensile load, and the compression face experiences a greater compressive load. When the wheel encounters a valley, the load on the spring decreases, but it is only when the wheel is off the ground that the spring is fully relaxed. Each leaf of the spring assembly experiences a life of cyclic unidirectional bending, with a superimposed steady load corresponding to the spring’s share of the weight of the vehicle. It is important to understand the effect of a compressive load applied to a shot-peened surface. As the load is applied, the peened surface, already near its yield point, will be overloaded. That material will flow, in compression. When the force is removed, the original compressive residual stress will have been reduced, removed, or even replaced by a tensile residual stress. This surface may be very susceptible to fatigue crack initiation, because of geometric features left by the peening process. Compressive residual stresses are recognised to combat fatigue crack initiation, in parts that operate in environments that include only tensile loads. It is less well known that a single compressive load cycle can destroy the beneficial effects of peening.
b) Welding
Residual stresses are not always present by design. They are often present as a by-product of another, necessary process. Welds in sheet-metal assemblies are frequently the site of severe residual stresses, caused by rapid and non-uniform cooling. The stresses around welds can cause distortion of the assembly, especially near the joint. Some distortions can be avoided by the use of fixtures to pre-load the assembly before welding. Stress-relieving heat treatments can reduce the magnitude of the residual stresses, but rarely eliminate them entirely. Attempts to repair distortion by cold working the region around a weld introduce new residual stresses by non-uniform yielding. The most successful stress-relieving heat treatments are carried out at temperatures high enough to significantly reduce the yield strength of the material, and are carried out with extensive fixturing to minimise distortion. Initially, the residual stresses will be reduced to the yield (also known as the flow stress), by local deformation. Further reduction of the residual stresses will occur by diffusion-controlled processes as the material is maintained at the chosen temperature. In heat treatment processes, there is also the possibility of modifying the material’s mechanical properties and compromising resistance to some forms of chemical attack. The selection of a stress-relieving heat treatment cannot be made without considering all the possible effects on the specific materials concerned. The effectiveness of stress-relieving heat treatments can best be assessed by measuring the residual stresses in test parts before and after treatment.
c) Turbine discs
The Nickel-base Superalloys used in such critical high temperature components as turbine discs in aircraft engines and in some electricity generators are often shot peened to prevent fatigue crack initiation. There are two sources of cyclic stress in gas turbines, high frequency vibrations and operational loads. High frequency vibrations may be present from acoustic sources and vibrations in other components. The operational loads are caused by centrifugal forces and thermal gradients. Each time the engine is started, there is an operational load cycle, which represents a low frequency fatigue cycle. In the hotter areas of a turbine disc, the temperature can be high enough to allow residual stresses to relax. Stress relaxation is a diffusion-controlled process in which the work-hardened crystal structure starts to recover its original order. The process occurs more rapidly at higher temperatures, and when the original crystal structure is more severely distorted. Reduction of the protective residual stress is accompanied by a reduction of the local yield strength in the affected peened areas. Not only are the protective features of shot peening reduced, but the surface topography of some peening processes can contain features such as rolled edges and folds that act as fatigue origins when the protective residual stresses and enhanced yield strength have gone away. Again, residual stresses can be measured in affected areas, and measurements of micro-hardness or X-ray diffraction peak width can assess the severity of plastic deformation in peened and partially relaxed surfaces. The predictable nature of stress relaxation may provide a method of assessing parts suspected of being over-heated. With an adequate history of operating hours and numbers of flights, and a database of measurements on parts that have seen service without recorded temperature excursions, it should be possible to confirm suspected temperature excursions. In some service environments, the missions experienced by individual engines and aircraft may be more aggressive than in the general avionics population. Assessment of the serialized parts at each opportunity would allow each part to be tracked and deterioration due to service recognised at overhaul.
d) Test coupons
There is a temptation to think of surfaces enhanced by peening in isolation when designing test programs to measure the benefits of a particular process. The compressive residual stresses introduced in the surface by peening are reacted by tensile stresses throughout the remaining cross-section. If the cross-section is limited to suit a particular testing machine, or if a small standard test coupon must be used, the tensile forces in the core can be significant, and the consequences of underestimating them can be severe. In low cycle fatigue testing, it is common to use peak stresses within a few ksi of the yield point of the material under test. If the peened cross sectional area is about 5% of the test-piece cross-section, we can expect to add several ksi to the tensile load carried by the core of the test piece. If the core of the test piece does pass the tensile yield strength, the test will effectively be voided, because tensile yielding in the core will introduce a new compressive residual stress when the load is removed. Because the cross-sectional area of the core is larger than that of the peened region at the surface, the forces from the new residual stress in the core are likely to be larger than the ones in the surface, leaving the surface in tension!
e) New techniques
Some recently developed processes are said to resist stress relaxation, because they do not cause such extensive distortion of the crystal structure, and they do not leave the surface with the overlapping dimples characteristic of a conventional shot peened surface. In general, larger diameter shot appears to leave a less damaged surface than does smaller shot for the same Almen Intensity. While the same Almen Intensity on strips can be achieved by different combinations of shot size and velocity, the properties and surfaces of the manufactured parts may be significantly different. The same is true for the comparison of traditional and modern peening processes. They may produce similar Almen arc heights, without producing similar parts.
Conclusion
The decision to apply a surface enhancement process to any component is a significant one. Changes in surface characteristics can produce changes elsewhere in the component, with unexpected changes in the way the component (or test piece) performs. As with any design change, it is necessary to consider the implications, and to proceed with caution.
For Information:
Robert Drake
Proto Manufacturing Ltd.
2175 Solar Crescent, Oldcastle
Ontario, Canada, N0R 1L0
Tel. +1.519.737.6330
Fax +1.519.737.1692
E-mail: proto@protoxrd.com
www.protoxrd.com


