E-Archive
Science Update
in Vol. 12 - May Issue - Year 2011
Fatigue Properties of Corroded Aluminium Alloy 7075-T651 – Influence Of Shot Peening

Fig. 1: Fatigue specimen details and dimensions (in mm)

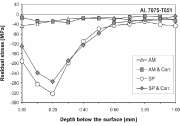
Fig. 2: Distribution of residual stresses versus depth for 7075-T651 aluminium

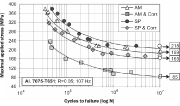
Fig. 3: Corrosion fatigue life for 7075-T651 aluminium


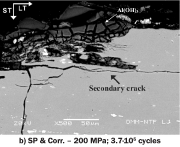
Fig. 4: Corroded specimen cross-sections analysis of fatigue cracks formed from pits
Pitting corrosion has a major influence on fatigue properties of structural elements made of high-strength aluminium alloys. Aluminium alloy 7075 in alloy system Al-Zn-Mg-Cu contains a high number of intermetallic particles, i.e. constituent particles, where heterogeneity of a microstructure has an essential influence on corrosion properties. Large constituent particles Al7Cu2Fe, Al23CuFe4, and Al2CuMg had different electrochemical potential compared to the aluminium matrix. Due to material electrochemical reactions in a corrosive environment, dissolved corroded areas lead to earlier fatigue crack initiation. Numerous studies relate corrosion surface damage to reduced material strength under dynamic loading. A cause of fatigue crack initiation in a corrosive medium is a stress concentration at pit locations. Stress levels at a pit area are in the magnitude of material plane strain fracture toughness, from which it is possible to estimate fatigue crack initiation. In order to improve material resistance to corrosion fatigue it is necessary to reduce pit-tip stresses in the corroded areas. Shot peening (SP) as intense plastic deformation in a thin surface layer affects fatigue properties by inducing favourable compressive residual stresses. The objective of the present study was to investigate the effect of surface hardening by SP on fatigue properties of corroded high- strength aluminium alloy 7075-T651 in the corrosive environment of a chloride solution. Fatigue behaviour of prior corroded as-machined and SP-treated specimens was evaluated to quantify the fatigue life changes.
A wrought plate of high-strength aluminium alloy 7075-T651 of 20 mm in thickness was delivered with the chemical composition (in wt. %): Al-5.78Zn-2.56Mg-1.62Cu-0.21Cr-0.05Mn-0.04Ti-0.09Si-0.18Fe. Static mechanical properties of the tested material were: Rm = 585 MPa, Rp02 = 532 MPa and A50 = 12%. Specimens for fatigue testing were prepared in a long traverse (LT) direction (Fig. 1). As-machined specimens were ultrasonically cleaned in ethanol. In research, the prepared specimens were evaluated in four different research combinations: a) as-machined (AM); b) as-machined and corroded (AM & Corr); c) shot-peened (SP); and d) shot-peened and corroded (SP & Corr). The specimens were SP-treated from all sides at the Metal Improvement Company in Germany using an air-blast machine. Cast steel shot MI-170H with hardness of 55 HRC and a nominal diameter of 0.40 mm was chosen. In order to avoid medium collision, the angle of nozzle inclination was shifted by 5° with regard to the vertical axis. A constant specimen distance from the nozzle of around 120 mm was maintained. Surface coverage was set to 150%. Comparative Almen intensity value of 12A was achieved. The specimens were placed in a salt spray chamber for surface corrosion tests in accordance with ASTM B117 for 168 hours (7 days). Before the corrosion testing, the SP-treated specimens were cleaned with concentrated HNO3 acid to avoid surface contamination by possible steel-shot residues.
The results of residual-stress measurement and fatigue testing with post fatigue fractographic analysis are presented. Residual stresses are one of the key influences on material fatigue resistance, also in a corrosive environment. The residual-stress measurements were made with a semi destructive hole-drilling method in accordance with ASTM 837. Figure 2 shows the measured residual stresses as a function of depth. Prior to SP treatment, the as-machined specimens showed residual stresses in the thin surface layer amounting to around -50 MPa, induced most probably due to the specimen preparation. Relatively small-magnitude measured stress of the as-machined specimens was neglected in further evaluation. The residual compressive stresses after SP treatment amounted to around -320 MPa, i.e. to nearly 55% of the ultimate tensile strength of the material delivered. Depths of the induced residual stresses after SP treatment up of to 500 ?m are greater than the depth of typical corrosion pits; therefore, residual stresses should influence local stress concentrations at the pit area in fatigue testing. Due to the surface corrosion at the SP-treated specimens, a relief of residual stresses was observed. Relaxation of the residual stresses at the surface amounted to around 23% of the residual stresses after SP treatment. No significant changes in residual-stress measurement of the as-machined and corroded specimens were noticed.
Fatigue testing was carried out without preliminary removal of the corrosion products from the surface. Bending fatigue testing of the specimens was carried out with a Rumul Cracktronic device at room temperature. A constant amplitude bending stress was applied in the range of the maximum applied stresses, i.e. those ranging between 15 and 65% of delivered-material tensile strength Rm. The testing resonant stress frequency was 107 Hz using a sinusoidal waveform at a stress ratio R of 0.05. A criterion of specimen failure was a drop of inherent oscillation by more than 3% where fatigue cracks occurred in a depth of up to 4 mm. In the present study a run-out criterion as a limit of fatigue strength was set at 10 million cycles. As the tests were limited in the number of specimens and the applied fatigue load cycles of up to 107 cycles, a more accurate fatigue endurance limit at applied stresses in a range of 5·108 or even in a range of 109 cycles cannot be confirmed without additional testing.
The semi-logarithmic S-N curves generated for the fatigued specimens in different research combinations are shown in Figure 3. Fatigue results for the as-machined specimens presented a baseline for further comparison of fatigue properties. The presence of a corrosive chloride environment has a major influence on fatigue properties of high strength aluminium alloy 7075. Low material corrosion resistance significantly decreased the fatigue life of the corroded specimens. The fatigue life at higher applied stresses decreased by a factor of about 10 compared to the baseline. The fatigue stress limit of the corroded specimens of 85 MPa at 107 cycles amounted to only 45% of the fatigue stress limit of the baseline at 189 MPa. Local stress concentrations at the degraded area resulted in much faster fatigue crack initiation.
A favourable influence of SP treatment on material fatigue resistance was found. SP treatment nearly doubled the maximal cycles to failure at the higher applied stresses when compared to the baseline. The fatigue limit of the SP-treated specimens increased to 218 MPa at 107 cycles. Furthermore, the SP-treated specimens outperformed the as-machined parent material when exposed to corrosive chloride environment by a factor of 2. The fatigue stress limit at 10 million cycles increased to 165 MPa. The experimental data assumed an increase of fatigue strength of the SP-treated material due to the compressive residual stress ability to influence crack nucleation. Strain hardening by shot peening retarded the crack propagation. Increased resistance to plastic deformation and the residual stress profile so provided a corresponding fatigue crack closure. The induced compressive residual stresses also retarded fatigue crack initiation in the pit area that resulted in better fatigue properties. Fatigue crack initiation was observed at much greater depths in the SP-treated specimens than in the as-machined specimens.
To characterize a true corrosion nature, corresponding cross-sectional microstructural images of fatigue specimens were studied. They are shown in Figure 4. The cross-sections were polished and etched using Keller's reagent. Multiple fatigue cracks initiated from a highly degraded surface of the as-machined specimen fatigued at 110 MPa (Fig. 4a). Individual surface layers of exposed microstructural grain bodies were entirely corroded due to an intergranular corrosion attack. The corrosive attack was oriented in agreement with local dissolution zones of the constituent particles lined in the rolling direction. A fatigued SP-treated and corroded specimen is shown in Figure 4b where crack initiated at the surface dimple. A residue of aluminium hydroxide Al(OH)3 at the surface and secondary fatigue crack propagation are also visible.
Prof. Dr. Janez Gruma
Faculty of Mechanical Engineering
University of Ljubljana, Slovenia
Tel. +386.1.477.12.03
Fax +386.1.477.12.25
E-mail: janez.grum@fs.uni-lj.si
Uros Zupancb
Welding Institute Ljubljana, Slovenia
Tel. +386.1.2809.422
E-mail: uros.zupanc@i-var.si


