E-Archive
Cover Page
in Vol. 13 - January Issue - Year 2012
Residual Stresses In The Automotive Industry

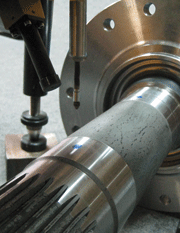
Residual stress measurement in an axel shaft

Fig. 1: Original and broken crankshaft: failure was initiated at a fillet and propagated by fatigue

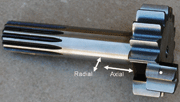
Fig. 2: Example of a shot-peened gear shaft where residual stresses were measured in two directions

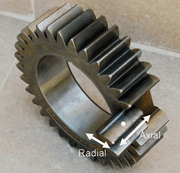
Fig. 3: Example of a shot-peened spur gear where residual stresses were measured in two directions

Fig. 4: Typical residual stress profile in a shot-peened gear
One of the main issues driving innovation in the automotive industry is the increase in power together with a reduction of fuel consumption. This is very important both from economic and ecologic perspectives. One way to achieve this goal is to reduce the automobile mass, by using new materials.
In order to improve the mechanical behaviour, new high strength steels are being used in some components. As a consequence, in the last years, the automotive industry is becoming very interested in these kinds of steels. However, before they are used in automotive components (especially if they will be subjected to oscillating loads) it is necessary to assess their fatigue behaviour in an accurate way.
During the last forty years, a number of studies have been carried out to predict the lifetime of structures and components under cyclic loads. A distinction has to be made between the two steps in fatigue cracking, i.e. initiation and propagation. Crack initiation is largely influenced by environmental and microstructural features as well as by surface defects and consequently it has a statistical component. On the other hand, crack propagation is less influenced by microstructural effects and can be studied in a deterministic way by using well-established fracture mechanics techniques. As a result, it is now possible to design and build complex structures that are capable of working safely –within certain intervals of statistical reliability– under oscillating loads. In spite of all this, it is still necessary to incorporate the effect of residual stresses into these calculations. This way the uncertainty on the lifetime values could be reduced.
Residual stresses are those that remain inside the material after their original cause (i.e. external forces or temperature gradients) has been removed [1]. They are generated by the different thermal and mechanical treatments employed in the fabrication of a component and they can be modified by applied loads during its service life. Residual stresses may cause dimensional changes and distortions in the components that render them useless for engineering applications. As an example, during welding, the temperature of the welding zone is higher than the temperature of the base metal. When the finished weld cools down, contraction of molten metal during solidification is resisted by colder surrounding metal, leaving residual stresses.
Residual stresses are dangerous because, unlike applied stresses, they are concealed. Consequently, engineers do not take them into account in design, and this may cause unexpected failures. If residual stresses are high enough, cracks will develop in the material with the risk of catastrophic failure. This is particularly important in the case of high-risk components for the transportation industry (i.e. automotive, aeronautics…), where residual stresses are essential in making reliable estimates of lifetimes. In addition, residual stresses are to be considered when the component failure will cause a serious economic loss, as happens for example with engine components in the automotive industry (i.e. gears, drive shafts, crankshafts…)
Shot peening has been successfully employed to improve mechanical behaviour by imparting compressive residual stresses at the surface of engineering components. If process parameters are carefully selected, the resulting residual stress field can be tailored to the particular needs of a given application. The final objective is to increase the durability under oscillating stresses (fatigue) or in the presence of aggressive environments (stress corrosion cracking and corrosion fatigue). If the crack initiation sites are close to the surface (which if often the case), shot peening can be particularly useful, because the maximum compressive residual stress (in absolute value) will typically occur between 50 to 100 microns from the surface. However, it should be taken into account that residual stresses must be balanced over the cross section. This means that if compressive stresses are generated close to the surface, there will be tensile ones at some other location in the cross-section.
There are several methods to measure residual stresses, including destructive and non-destructive techniques. From the non-destructive techniques, X-ray diffraction methods are widely used for a quantitative assessment of residual stresses. X-rays are particularly suitable for surface and subsurface measurements (with material removal by electropolishing, up to approximately 0.5 mm depth). Consequently, laboratory X-ray diffraction is very useful for a thorough initial characterization of the residual stress profile in a shot-peened component. This way the process parameters can be set for a given application during the implementation steps. Later, in the productions steps, it can be used as an effective control tool to set acceptance criteria for a batch of material.
Residual stresses affect both steel producers and their clients, i.e. component manufacturers for the automotive industry. On one hand, the producers are subjected to increasing pressure from their clients to provide them with accurate information about the residual stress level of their products. In addition, they suffer the dimensional instability problems associated to residual stress relaxation, which produces rejection of their products. On the other hand, the component manufacturers need to know the influence of the fabrication process on the final value of residual stresses. This way it would be feasible to improve the reliability and the durability of automotive components by tailoring their residual stress state.
In the following paragraphs, some examples of the importance of residual stress determination in the automotive industry will be presented.
Automotive industry
Crankshafts
A very important element in automotive engines is the crankshaft, which translates the linear piston motion into rotation. A great potential exists in decreasing its mass and increasing its lifetime by replacing the currently used material, cast iron, for steel. When the engine is running, the crankshaft is subjected to mechanical fatigue. This can be particularly damaging at locations of stress concentration, such as holes or sharp edges, as shown in the broken crankshaft of figure 1. In this case, the failure was initiated at a fillet (stress concentration) and was propagated by fatigue. Surface treatments are used to improve the durability by generating beneficial residual stresses in the near-surface layer of the component. In order to quantify and optimize the particular surface treatment employed, residual stresses have to be measured in the crankshaft at the most critical locations. The experimental measurements will serve to optimise the process parameters and to calibrate routine quality control procedures.
Gears
The manufacturing process of gears involves carburizing, which is used to increase their fatigue strength and wear resistance. This is due to the generation of compressive residual stresses at the surface region associated to the carburizing and quenching operations. These stresses –which can be as high as -600 MPa at the gear surface– reduce the mean applied stress in the fatigue cycle and consequently increase the gear bending fatigue strength in a noticeable way. A similar result can be obtained by surface induction hardening.
In this case, residual stresses are generated by the volume expansion associated to the phase transformation from austenite to martensite. Further increases on compressive residual stresses can be achieved by hard shot peening, and this is immediately reflected on improved bending fatigue durability. In fact, a comprehensive study has led to the following results [2]:
1. There is a linear relationship between the maximum value of the compressive residual stress introduced by shot peening and the bending fatigue strength of gears.
2. The maximum compressive residual stress not only depends on the shot peening condition, but also on the retained austenite volume before peening.
It is important to point out that the retained austenite fraction can also be determined by X-ray diffraction.
Failure analysis
Residual stress analysis of used parts can be very useful to assess and control the quality of the manufacturing processes and to detect potential problems. This way manufacture- induced defects that may reduce the strength or the lifetime of components can be detected. One example of this is abusive grinding, which may happen if unfavourable process parameters of poor cooling conditions are employed. It has been found that in an abusively ground gear tooth, the residual stress distribution at the near surface region is noticeably displaced to tensile stresses. If gears with gentle and abusive grinding are compared, their residual stress profiles are quite different. However, immediately at the gear surface, compressive residual stresses are found in both cases [3], which may lead to wrong conclusions if only surface measurements are performed.
Additionally, manufacturing steps that were not originally planned in the manufacturing sequence can be detected by residual stress measurements. This happens in the case of welds where a manual grinding process is applied with a portable grinding machine as a refinishing treatment of a weld seam. It has been reported that considerable tensile stresses can be introduced in the near surface layers with this apparently innocuous treatment [3]. Consequently, shot peening is recommended in this case after the manual grinding to remove tensile stresses and to introduce compressive stresses in the near surface layers.
Conclusions
Empirical correlations between process parameters and residual stress distributions are available for a number of processes. Consequently, it is demonstrated that residual stress analysis can be used as a very powerful quality control tool. From the examples shown above, it is clear that not only surface measurements but complete in-depth residual stress distributions are also needed for accurate assessments. In addition to measurements in new components, residual stresses should also be measured in used components to check the stability of the residual stress distributions with service time. This is particularly important in components subjected to fatigue loads, where the evolution of residual stresses with fatigue loading should be clearly known. As a result, the effect of a particular residual stress distribution on the durability of a given component should be further investigated. Finally, a close collaboration between manufacturers and residual stress analysis providers is needed in order to make residual stresses work for us and not against us.
References:
[1] Noyan IC, Cohen JB. Residual stress. Measurement by diffraction and interpretation. Springer-Verlag, New York, 1987.
[2] Handbook of residual stress and deformation of steel. Totten G, Howes M, Inoue T Eds. ASM International, Metals Park, Ohio, 2002
[3] Hauk V. Structural and residual stress analysis by non-destructive methods. Elsevier Science, Netherlands, 1997.
For Information:
Accurate Stress Measurements, S.L.
Olmo, 8. Local 2
28231 Las Rozas de Madrid, Spain
Tel. +34.910012829
Fax +34.916360388
E-mail: accuratestress@gmail.com
www.acstress.com


