E-Archive
Science Update
in Vol. 4 - January Issue - Year 2003
Investigating the Effects of Shot and Laser Shock Peening on the Fatigue Behaviour of 2024-T351 Aluminium Alloy

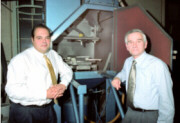
Dr. Eduardo de los Rios (right) is a Royal Academy of Engineering Research Fellow at the University of Sheffield. He is also a member of the International Shot Peening Committee. Dr. C. A. Rodopoulos (left) is a NATEC Research Fellow, member of ASME and chartered engineer in the EU (Eur-Ing).
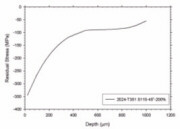
Figure.1: Residual stress distribution for 2024-T351 peened to a 4A intensity. Measurements were in accordance to ASTM E837-95 (hole-drilling) standard.
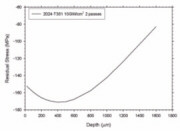
Figure.2: Residual stress distribution for 2024-T351 laser shock peened with a laser intensity of 10GW/cm2 and 2 passes. Measurements were in accordance to ASTM E837-95 (hole-drilling) standard.
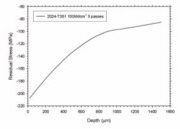
Figure.3: Residual stress distribution for 2024-T351 laser shock peened with a laser intensity of 10GW/cm2 and 3 passes. Measurements were in accordance to ASTM E837-95 (hole-drilling) standard.
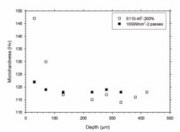
Figure.4: Microhardness (strain hardening) results after shot and laser peening.
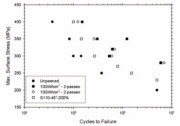
Figure.5: S-N curves of the six selected test groups. All data beyond the 5 million cycles mark, represent run-outs.
![Table.1. Chemical composition of 2024-T351 in wt% [2].](https://www.mfn.li/storage/e-archives/article-pictures/123/363.gif)
Table.1. Chemical composition of 2024-T351 in wt% [2].
![Table.2. Mechanical and Physical properties of 2024-T351 at room temperature [2].](https://www.mfn.li/storage/e-archives/article-pictures/123/364.gif)
Table.2. Mechanical and Physical properties of 2024-T351 at room temperature [2].

Table.3. Average surface roughness values of selected testing conditions.
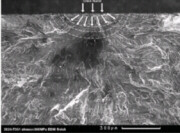
Figure 6a: Fractograph of unpeened fatigued specimens
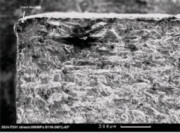
Figure 6b: Fractograph of shot peened fatigued specimens
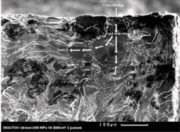
Figure 6c: Fractograph of laser shock peened fatigued specimens.
Dr. Eduardo de los Rios and Dr. Chris A Rodopoulos Division of Aeronautical Applications, SIRIUS, Department of Mechanical Engineering, The University of Sheffield, S1 3JD, UK
Introduction
The use of surface engineering to improve the fatigue properties of engineering components has been part of the manufacturing process of aerospace and automotive industries for more than 10 years. Undoubtedly, surface engineering is characterised by empiricism and in house data-bases. The above caused the concern of many companies, especially small and medium enterprises with minimum testing facilities, over the potential of surface engineering. There are many cases, known to the authors, where surface engineering, in the form of shot peening, produced an unexpected outcome and caused an unjustified spending.
The response of the academic community to surface engineering was the least behind schedule. The above can be easily verified by searching the proceedings of the International Conference on Shot Peening (ICSP) [1]. Academic research, being mainly concerned with new material technologies and designs, somehow bypassed this technology and to some extent considered as “a simple problem with a simple solution”. The above dramatically changed in the last 5 years when manufacturers were faced with unexpected problems. Typical examples are, the sub-surface cracking that can easily override the accuracy of non-destructive inspections and consequently jeopardise damage tolerance, the rapid relaxation of the residual stresses, etc.
The need for a scientific approach that would relate fatigue damage and surface engineering was recognised by the two authors and by three British organisations, namely, BAE Systems, EPSRC and the Royal Academy of Engineering. In this joint effort the four bodies were faced with the question of optimising the fatigue properties of a common aerospace materials (2024-T351) by shot and laser shock peening. The following work represents part of the above endeavour.
Material, Surface Engineering and Testing
Material, supplied by Airbus UK, was received in the form of a 30.0 mm thick rolled plate. A full chemical composition and mechanical properties are given in Table 1 and 2 respectively. The material has a pancake shape grain structure with an average grain size of 220?m, 80?m and 52?m in the longitudinal, transverse and thickness direction.
Shot peening was performed using a Tealgate peening machine. The peening intensity was 4A and it was achieved using a S110 (diameter 0.279mm and hardness 410.5-548.5Hv) spherical cast steel shot, incidence angle of 45° and a coverage rate of 200%. These conditions were recommended in [3] where a study of maximum, near surface, residual stress profile to counterbalance the increased surface roughness profile was made.
Laser shock peening was carried out in water confinement using a Continuum YAG Laser (Powerlite plus) operating in the green wavelength (0.532?m) regime. The output energy was approximately 1.3 J with pulse duration in the 6-7ns regime. All specimens were protected from the thermal effects of LSP by a 70?m aluminium coating. The laser intensity was set to 10GW/cm2 (estimated pressure of 5GPa) with a focal point of 2mm. The specimens were treated using an overlapping rate of 50% (1 pass=4 local pulses) and charged with 2 to 3 passes.
The residual stress and strain hardening distributions after both treatments are shown in Figures 1-4.
The results indicate that the selected shot peening conditions produces significant hardening in the 0-100?m region. In contrast, strain hardening due to laser shock peening was negligible.
Peened and unpeened specimens were tested under four-point bend loading. Both the specimen design and the testing conditions were chosen in order to minimise the possibility of subsurface cracking while at the same time maintaining a statistically valid area for crack initiation. The stress gradient is given by the linear relationship ?/?max=0.36z, where z is the position of the bending fibre from the neutral/central fibre. Prior to testing, average surface profiles were taken (see Table 3) to investigate the effect of shot and laser peening on the original, spark eroded, surface roughness. In Table 3, the parameter Ra is the centre line average, Rt is the maximum peak-to-valley height and S is the mean spacing of adjacent peaks. The results from the cycling testing are shown in Figure 5.
Results and Conclusions
The results in Figure 5 indicate that both treatments yielded a life improvement. In the region of High Cycle Fatigue (HCF) the improvement due to shot peening is about 15-17% compared to the untreated materials. Laser shock peening on the other hand delivers an improvement in the region of 40-52% of the fatigue limit.
Comparison between the residual stress profile developed by shot peening and laser shock peening forces the question “ Why the performance of shot peening was so poor?”. Answer to that question comes from the fractographic examination of the fractured specimens. Figure 6a shows a typical crack nucleation and propagation of multiple fatigue cracks for the case of the unpeened material. Figure 6b on the other hand shows that in the case of shot peening the fracture surface, apart from a small region (faceted stage I growth - dashed lines), is surrounded by cleavage like fatigue fracture. The above indicates fast crack propagation, possible due to surface ductility loss. In the case of laser shock peening, Figure 6c, the fracture surface shows evidence of crack branching (relaxation of the stress field ahead of the crack tip) that can be accounted for by its superior fatigue performance.
In summary the following conclusions can be drawn:
a) shot peening and laser shock peening are expected to increase the fatigue life of poorly machined components thus reducing the production cost.
b) laser shock peening was found to cause negligible strain hardening as compared to shot peening.
c) laser shock peening exhibits a far more superior fatigue improvement compared to shot peening.
d) surface ductility loss can be accounted for by the poor performance of shot peening.
References
1. Proceedings of the International Conference on Shot Peening (ICSP 1-8)
2. ASM Materials Handbook, 3rd Edition, Metals Park, Ohio.
3. J. S. Romero (2002) Optimisation of the shot peening process in terms of fatigue resistance, Ph.D. Thesis, The University of Sheffield.
For Information:
The University of Sheffield, England
Dr. Chris A. Rodopoulos
Tel. +44.114.222 7710
E-mail: c.rodopoulos@sheffield.ac.uk


