E-Archive
Science Update
in Vol. 17 - March Issue - Year 2016
Abrasive Waterjet Milling As An Efficient 3D Pre-shaping Technology For Hard To Cut Materials

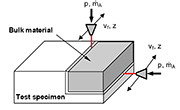
Figure 1: Schematic representation of AWJ-CDM as a pre-shaping technology

Figure 2: Schematic representation of the target values

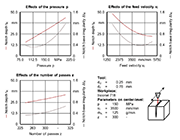
Figure 3: Effects on the notch depth tK and notch depth irregularity ?tK

Figure 4: Interaction between pressure p and feed velocity vf on the notch depth tK

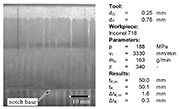
Figure 5: Machining example of AWJ-CDM of Inconel 718
Introduction
High-performance materials such as nickel or titanium alloys are used in the aerospace and energy industry in the hot sections due to their outstanding mechanical, thermal and corrosive properties. The continuous development of these materials; for example, to enhance the temperature resistance or the resistance against oxidation leads to an increase of the operating temperatures and thereby to an increase of the efficiency of these so called turbo-engines. Unfortunately, these improved material properties often lead to difficulties for cutting technologies; e.g. long machining times or high tool wear when machining them with conventional cutting processes [1]. An economical industrial application of these materials is only possible with an adequate manufacturing method.
Despite its wide range of use, the nickel-alloy Inconel 718 can still be considered as a hard-to-cut material. This material shows a good long period creep resistance at temperatures up to 700 °C, resistance to oxidation up to 1000 °C, and excellent corrosive properties. Due to this combination, Inconel 718 is used in a variety of applications for example in aircraft engines or cryogenic tanks.
Abrasive waterjet (AWJ) machining is a flexible manufacturing technology with a wide range of applications. A pumping system compresses water, which is then compressed through an orifice with a small diameter of about 0.3 mm to create a waterjet with high kinetic energy. This waterjet then passes an additional mixing chamber with an injector to feed abrasive media followed by a nozzle, typically 1 mm in diameter, to accelerate and focus the abrasives. This jet can then be used to cut a wide range of materials or material combinations. Even hard-to-machine materials can be economically and reliably processed with AWJ with reduced mechanical or thermal damages [2]. The great advantage of AWJ is the fact that the tool lifetime of the orifice and focus is independent of the material that is processed. However, at the moment, the industrial use of AWJ is limited to machining operations where the workpiece is completely cut through such as in cutting or drilling operations.
The goal of this investigation was to use the advantages of the AWJ to process the nickel-alloy Inconel 718 to create notches with predictable depths without completely cutting through the workpieces for high aspect ratios. By overlapping those produced notches, this so-called abrasive waterjet-controlled depth milling (AWJ-CDM) can be used for pre-shaping hard-to-machine materials prior to end-shaping with conventional cutting processes as schematically shown in Figure 1. Using design of experiments, a model to describe the notch depth and notch base irregularity as a function of the setting parameters for high aspect ratios in Inconel 718 was developed and used in a machining example.
Experimental procedure
A six-axis robot was used for jet manipulation with a maximum feed velocity of up to vf = 2.5 m/s. The water pressure was realized with a hydraulic high-pressure intensifier delivering up to p = 600 MPa and a flow rate of up to VmW = 2.5 /min. The abrasive flow rate could continuously be varied from mA = 50 to 500 g/min. A standard combination of orifice with a diameter of dD = 0.25 mm and focus with a diameter of dF = 0.76 mm and a length of lF = 76 mm were selected. Garnet sand Mesh 80 was used as the abrasive medium. The tested material was nickel-alloy Inconel 718. The investigated parameters were the jet pressure p, the feed velocity vf, the abrasive flow rate mA, and the number of passes z. The stand-off distance was kept constant at s0 = 2 mm. The analyzed target values were the average notch depth tK and the notch base irregularity ?tK (Figure 2). The applied central composite design (CCD) consisted of three successive experimental steps. A factorial design with two parameter setting levels was used to determine main effects and parameter interactions. Including a center point indicates a nonlinear behavior. A set of axial points were used to analyze the curvature of the function. Empirical models were then developed to describe the target values as a function of the parameter settings using linear regression. The CCD was described in detail by Myers et al. [3].
For measuring the notch depth tK and its irregularity in the base ?tK the test specimens were cut along the notch base after the experiments using wire electrical discharge machining (EDM). These target values were determined using the optical measuring device FRT microProf 100.
Results
The analysis of the data showed that all four investigated parameters had significant main effects on the target values. Furthermore, two factor parameter interactions and quadratic effects could be observed. Empirical models were developed to predict the notch depth tK and their base irregularities ?tK as a function of the parameter settings. Figure 3 shows examples of the empirical models for the pressure, feed velocity, abrasive flow rate and number of passes. For this representation, the remaining parameters were kept constant on center-level each.
It showed that with rising pressure, the notch depth increased with an almost linear behavior. At the same, time the irregularity in the base increased progressively with rising pressure. By increasing the feed velocity, the notch depths as well as the notch base irregularities were reduced in regressive behaviors. The raise of the number of passes led to a relatively linear increase of both target values. Furthermore, two factor parameter interactions and quadratic effects could be observed by the use of the CCD-design. An example for the parameter interaction is shown in Figure 4. Increasing the pressure and lowering the feed velocity at the same time resulted in a higher notch depth than would be expected when examining the parameters independently. This can be seen in slope variation marked with red arrows in Figure 4.
The empirical models to predict the target values are:
tK = 28.94 + 6.95?p - 6.51?vf + 2.08?mA + 2.24?z - 1.41?p?vf + 1.47?p?mA+0.50?p?z - 0.50?vf?mA - 0.51?vf?z + 1.55?vf² - 1.35?z² (Eq. 1) and ?tK = 0.54 + 0.25?p - 0.20?vf - 0.19?mA - 0.13?p?vf + 0.11?p² + 0.13?vf² + 0.14?mA² (Eq. 2)
The coefficients of determination are R² = 0.99 for tK and R² = 0.82 for ?tK.
Due to different impacts of the setting parameters and their parameter interactions different parameter settings can result in a similar notch depth tK. However, the base irregularity as well as the machining time and therefore the productivity of the process varies strongly. Depending on the priority - on manufacturing time or accuracy - the parameter settings must be adapted to the manufacturing strategy.
Machining example
The goal of this machining example was to create a notch with a depth of tK = 50 mm with an irregularity in the base as small as possible. Equations 1 and 2 were used and a base irregularity of ?tK,m = 1.6 mm was predicted for the given depth of cut. The experimentally achieved average depth of cut was tK = 50.1 mm with an irregularity in the base of ?tK = 0.3 mm. Figure 5 shows the machining example on an Inconel 718 block. The test specimen was cut along the notch base using wire electrical discharge machining.
Conclusions
By using statistical methods, an empirical model to predict the notch depth and notch base irregularity for high aspect ratios in Inconel 718 was developed. The results showed that for predicting the notch depth and its irregularity in the base, not only main effects but also parameter interactions as well as quadratic effects had significant influence and could not be neglected. The pressure and feed velocity showed the biggest effect on both target values. In general, the raise of pressure or number of passes led to a higher depth of cut but resulted in an increase of the base irregularity. The feed velocity showed a contrary effect. The developed models were applied for a machining example creating a notch with a depth of 50 mm with an irregularity in the base of about 0.3 mm. By overlapping these notches, 3D near-net-shaping via AWJ-CDM would be an adequate machining solution for hard-to-cut materials prior to conventional milling.
Acknowledgements
This paper is based on results acquired in the project DFG UH 100/165-1, which is kindly supported by the German Research Foundation (DFG).
References
[1] Schulz, H.; Dorr, J.; Rass, I. J.; Schulze, M.; Leyendecker, T.; Erkens, G.: Performance of oxide PVD-coatings in dry cutting operations, Surface and Coatings Technology 146/147 (2001), p. 480 - 485.
[2] Hashish, M.: A Modeling Study of Metal Cutting With Abrasive Waterjets. Journal of Engineering Materials and Technology 106 (1984) 1, p. 88 - 100.
[3] Myers, R. H.; Montgomery, D. C.; Anderson-Cook, C. M.: "Response Surface Methodology: Process and Product Optimization Using Designed Experiments", 3rd Edition, January 2009.
Prof. Dr. h. c. Dr.-Ing. Eckart Uhlmann
Technische Universität Berlin, Institute for Machine Tools and Factory Management
Berlin, Germany
E-mail: eckart.uhlmann@iwf.tu-berlin.de
Tel: +49.30.314 23349
Dipl.-Ing. Fabian Faltin
Technische Universität Berlin, Institute for Machine Tools and Factory Management
Berlin, Germany
E-mail: fabian.faltin@iwf.tu-berlin.de
Tel: +49.30.314 23624


