E-Archive
Cover Page
in Vol. 17 - September Issue - Year 2016
Robotized Solutions For Measuring Residual Stresses By X-ray Diffraction
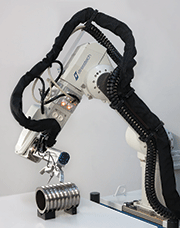
Robots make measuring residual stresses by X-ray diffraction easy on parts with complex shapes, wide surfaces or hard-to-reach areas

Figure 1: X-ray diffraction from crystal lattice planes (Bragg's law)
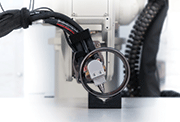
Figure 2: Mini Tube in action
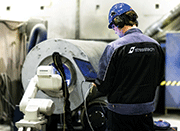
Figure 3: Xstress Robot measuring inside a cylindrical part
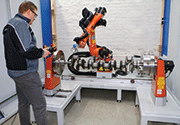
Figure 4: Xstress Robot making measurements on a crankshaft
Shot peening is a widely used process for producing compressive stress to the surface of the workpiece, thus making it more durable. Like many manufacturing processes, shot peening also requires quality control including accurate stress values. A common technique for measuring residual stresses of shot-peened workpieces is X-ray diffraction.
Stresstech has more than 30 years of experience in non-destructive process control and quality inspection. The Stresstech product line includes stress analyzers utilizing Barkhausen Noise technology, hole drilling (ESPI: Electronic Speckle Pattern Interferometry), and the focus in this article, X-ray diffraction. Keeping up with advances in technology and manufacturing, the product line includes many automated measurement features and use of industrial robots. Industrial robots can be used in measuring residual stresses from workpieces with complex shapes and wide surfaces, creating a flexible measurement process through automation. Stresstech's robotized X-ray measurement systems are known as Xstress Robot.
Residual stress determination from the X-ray diffraction data
X-rays are electromagnetic radiation waves having a shorter wavelength i.e. more energy than visible light. The short wavelength X-rays are well-suited for probing the interatomic distances in materials. Using the interatomic spacing as the ultimate gauge length, the X-ray technique is ideal for and applicable to all crystalline materials, especially for metals, but also for ceramics. It measures the absolute stress without the need for an unstressed sample for calibration.
Materials having a periodic crystal lattice structure can be described with so-called unit cells, which is the smallest volume cell containing the information to specify the crystal structure of various materials. Lattice structure is formed by connecting the points where atoms are located. The most common coordinate system used to describe these unit cells is the Miller index notation.
The most common X-ray source is the X-ray tube, where electrons are bombarded to a target metal anode. Thermionic electrons are formed by heating a tungsten filament acting as a cathode. The electrons are accelerated with a high voltage (25 kV to 60 kV), which gives the electrons enough energy to remove electrons from the target metal atoms, leaving a hole in the core shell. When an outer shell electron fills this hole, a characteristic radiation specific to the anode material is emitted. This almost monochromatic radiation is used in X-ray diffraction experiments. In addition to the characteristic radiation, broadband bremsstrahlung X-rays are also emitted due to electron deceleration.
Residual stresses are determined from the diffraction data by calculating the strain from the diffraction peak positions. Stresses acting on the measured material alter the distance between the lattice planes, which can be measured. In practice, a metal powder with no stress is measured first to calibrate the device for a certain material. During the calibration, the detectors are placed to the known diffraction angle of the powder and the angular scale is set. Stress is then calculated by measuring lattice distance with multiple tilt angles and the results are plotted as d vs sin²X graph, where d is the measured lattice spacing and χ is the tilt angle. The residual stresses can be determined from the slope of this d vs sin²X graph.
X-ray diffraction is a non-destructive and expedient method to measure residual stress. The amount of exposed area affects the measurement time, and using a larger collimator reduces the needed time to make measurements.
Bragg's law describes X-ray diffraction from crystal lattice planes. It is written as ?=2dsin?, where ? is the wavelength of the X-rays, d is the lattice plane distance and ?, is the diffraction angle, Figure 1. Bragg's law assumes incoming and diffracted waves to be in phase and undergoing constructive interference. Bragg's law has proven itself to be accurate and correct making it useful tool for diffraction applications.
Reaching the limits with robots
The industrial robot system consists of a robotic arm having multiple axes, which are controlled by a robot controller. The controller can also control external axis and rotating units, which can be used to manipulate the workpiece. Robots come in various sizes with different payload and reachability. An important part of the robot application is the tool attached to the flange of the robot, which the robot needs to complete its task. The tool can be almost anything: a gripper, welding torch, glue dispenser and so on. The robot system typically has peripheral I/O devices, which can be operated and monitored from robot controller. One of the key features is that the robot is also reprogrammable.
The Xstress Robot system is a turnkey solution for measuring residual stresses. It uses an industrial robot as a goniometer, thus bringing more flexibility and automation to measurement processes. The Xstress Robot system consists of an industrial robot including a robot controller, X-ray tube and collimators, the X3003 main unit, and a computer with XTronic software. As an option, Xstress Robot can use a Mini Tube instead of a standard G3 X-ray tube to access smaller spaces as presented in Figure 2.
The biggest advantage of using Xstress Robot with an industrial robot in X-ray measurement is its capability to move the G3 measurement head to otherwise hard-to-reach spaces to generate accurate measurements. A wide workspace provides Xstress Robot with the means to measure large and complex parts, eliminating the need of moving the part between the measurements. Moreover, the measurement process is automatic because of the mapping feature of measurement points in XTronic. Xstress Robot is agile and can reach difficult positions, which would be an impossible task with a standard goniometer, as in the case of a cylindrical tube. The robot can easily take the measurement head inside the tube to measure stresses from, for example, the weld seam of the tube as shown in Figure 3.
An external axis can be included to the system to rotate components such as crankshafts during the measurement process thus giving the robot even more accessible space for measurements. With the rotating axis, the Xstress Robot system can access e.g. every side of a shaft. Rotating units are an excellent choice in highly automated applications, as shown in Figure 4.
Easy to use
Stresstech's Xstress Robot was designed with the end-user in mind. Most of the work is done with the XTronic software, which controls the robot and calculates the residual stresses. In a normal operation, the G3 goniometer attached to the robot arm is first manually positioned to the measurement positions. Positions are mapped to a measuring program, which is then executed from the XTronic software. During the measuring program, the robot moves the G3 goniometer to the measuring positions and measures the workpiece based on the parameters defined in XTronic. Residual stresses are calculated in real time and the data is displayed with XTronic in graphs. The end-user does not need to spend time in data processing since the measuring results can be read instantly from the XTronic in a user-friendly form.
XTronic offers various functions to support the operation of the Xstress Robot goniometer. The robot can be moved to programmed positions through XTronic instead of using the teach pendant of the robot. This helps to verify the measurement points. Moreover, XTronic has functions for aligning the X-ray tube to achieve more accurate measurement results. Whereas in standard goniometer alignment must be done manually, robot goniometer can be aligned just by modifying the tool data from the XTronic and robot aligns itself automatically.
Measurement services
Measurement services with different methods are provided globally to customers at Stresstech Group's laboratory facilities in Finland, Germany, India and the United States. A customer can send shot-peened workpieces straight to the laboratory for X-ray measurement. The service is a good option, if there is a limited amount of workpieces to measure and installing an own robot system is not a requested solution. Stresstech's measurement laboratory is equipped with various measuring tools including an Xstress Robot system, which is mainly used for measuring large and complex workpieces.
Sometimes workpieces needing to be measured are too large for transporting them to the laboratory. Because of the mobility of Xstress Robot, the measurements can also be made on-site. The Xstress Robot system used at the measurement laboratory is an all-in-one-package system installed on a mobile cart, which can be taken to customer's factory floor with minimum effort. As Xstress Robot is so compact that it fits into a van, the whole Xstress Robot system can easily be transported to a customer's factory for stress measurements.
Mobility also benefits the reachability limits of the robot. Even extremely large workpieces can be measured just by moving Xstress Robot between the measurement positions instead of moving the workpiece. First, the robot can be moved into one position and all the measurements are done within the reachability of the robot. Next, the robot is moved to a new position for the next measurement without the need of moving the heavy workpiece at all. This process is repeated until all the measurements are done. Thanks to the mobility of the Xstress Robot system, large and complex workpieces can be measured on site with minimum effort and short measurement times.
Stresstech Oy's measurement service laboratory serving customers globally is an accredited testing laboratory for residual stress and retained austenite measurements with non-destructive X-ray diffraction method. (SFS-EN ISO/IEC 17025:2005 Accredited Measurement Laboratory (FINAS T294).
For Information:
Stresstech Oy
Tikkutehtaantie 1
40800 Vaajakoski, Finland
Tel. +358.14.333 000
E-mail: info@stresstech.com
www.stresstechgroup.com


