E-Archive
Articles
in Vol. 17 - November Issue - Year 2016
Development of a Non-Destructive method using Eddy Currents to control NanoPeening®

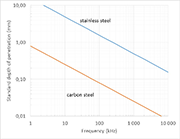
Figure 1: Evolution of the standard depth of penetration for stainless steel and carbon steel

Table 1: Chemical composition of the stainless steel 316 used in this study, in weight %

Table 2: Instrument settings used to inspect NanoPeening

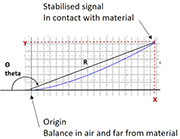
Figure 2: Illustration of the trace visualised on Weldcheck instrument

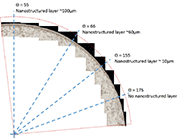
Figure 3: Qualitative control of NanoPeening

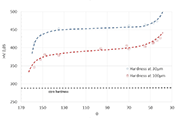
Figure 4: Evolution of the hardness at 30
Introduction
NanoPeening® is a mechanical impact treatment developed by Winoa for achieving a nano-size grained layer on metallic mechanical parts [1].
At early stages of development of NanoPeening® process, the methods available to control the treatment applied on the materials were destructive and time consuming: hardness profile analyses and microscopic observations. Both methods required a sample preparation and could not be used to control the parts blasted globally.
Different non-destructive methods were eventually available to help characterize the nanostructured layer: the Barkhausen effect, nano-indentation, ultrasonic or electromagnetic inspection. None of them could offer a ready-to-use method and a development stage was mandatory.
Taking into account the investment cost for the instrument (< 10k€) and the ease of implantation of the method, Eddy Currents technique appeared to be a good opportunity.
Eddy Currents Inspection
Eddy currents inspection is commonly used in industry to detect surface defects (cracks or voids), to measure coating film thickness or sort metallic wastes [2], but also to control thermal treatment [3].
This non-destructive technique can be briefly described as follows: a probe containing a wire coil approaching a conductor is generating an electric current within the conductor. This electric current will in turn generate currents opposed to the ones in the coil (Eddy currents) and an associated magnetic field. Usually the probe acts as emitter and receptor. The field variation depends on the magnetic permeability ?, the electrical conductivity ? of the conductor, and the presence of defects.
An important parameter to have in mind when working with Eddy currents is the standard depth of penetration. This length is defined as the distance from the surface of the conductor for which the Eddy currents have lost 63% of their amplitude.
In first approximation, the depth of penetration ? of a material can be expressed as:
"formula cannot be displayed online" (1)
Where f is the frequency of the magnetic field in the coil.
In the case of stainless steel compounds, for a frequency of 100 to 500 kHz, the depth of penetration is in the range of a few hundreds of micrometers. In the case of carbon steels, in the same frequency range, the depth of penetration is one order of magnitude below (Figure 1).
Any treatment that modifies ? or ? in a sub-surface layer of thickness of the same order of magnitude as ? can be characterized by Eddy currents inspection. The only requirement is to establish some preliminary correlations between the instrument reading and the material characteristics. Usually these correlations are done through destructive analyses.
NanoPeening® treatment induces some structural modifications in the sub-surface layer of the material with a typical depth of several tens of micrometers [4]. So, the development of a method of characterization for NanoPeening® based on Eddy currents inspection is possible for most of the metallic parts.
Materials and method
The results presented in this article have been obtained with austenitic stainless steel AISI 316 from Ugitech (UGIMA 4404HM bar turned polished solution annealed H10 round 30mm). Composition of the stainless steel used is given in Table 1.
The micro-hardness profile was obtained with a Knoop indenter using a Leco micro-hardness tester.
Microscopic observation and micro-hardness profile were obtained on cross-section samples after cutting, plugging and polishing.
Eddy currents analyses have been done with WeldCheck instrument from Ether NDE equipped with a 45° angled, shielded probe. Equation 1 demonstrates that low frequency tests increase the standard depth of penetration and are more suitable for inspecting NanoPeening®. The frequency was fixed to 200kHz and the instrument settings were optimised to visualise the Eddy currents responses within one screen (Table 2).
The signal given by the instrument is a trace in a phase diagram. Experiments showed that the most representative parameter to consider and to correlate with the NanoPeening® treatment is the phase angle theta, ?, of the stabilised point once the probe is in contact with the material (Figure 2).
Results
Surface roughness influence
Among the parameters that are known to influence Eddy Currents analyses, the surface roughness is often cited. Surface roughness with Ra of 2 to 5µm is created during the mechanical blasting of stainless steel parts, so its influence had to be checked.
Two samples have been prepared:
Sample 1: polish flat surface
Sample 2: polish flat surface + mechanical blasting to get 100% coverage (Ra~3µm)
These samples did not present any nanostructured layer and only differed by the surface roughness. An Eddy current inspection showed that their response was identical.
Surface roughness was not found to be an interfering parameter, certainly because the frequency of the magnetic field chosen was low enough (200kHz) to allow a good penetration of the currents within the material (? >> Ra).
NanoPeening® qualitative control
Eddy Currents inspection appear to be an efficient technique to check the homogeneity of the blasting treatment.
Once the probe is in contact with the surface, one can move it all around and follow the phase and amplitude of the signal on the instrument screen. If the signal is changing, one possibility is that the blasting treatment is not homogeneous.
Figure 3 illustrates this qualitative control. NanoPeening® treatment has been applied on a stainless steel cylinder. Blasting parameters were adjusted to create a progressive nanostructured layer on the blasted surface. The gray layer on the outer surface of the cylinder on the microscopic picture is the nanostructured layer obtained with NanoPeening®.
An Eddy Currents inspection has been done on the surface of the blasted cylinder (theta values reported on Figure 3) and compared to the nanostructured layer thickness measured with microscopic observations. It is very difficult to directly correlate these analyses because the estimation of the nanostructured layer is highly subjective. Nevertheless, theta value is a good indicator to know if the NanoPeening® treatment has been correctly done, and variation of theta value indicates difference of the nanostructured layer underneath.
Correlation between Eddy Currents response and hardness profile
The aim is to correlate theta values measured with Eddy Current instrument to the hardness at a given depth of the materials after NanoPeening®.
Different NanoPeening® treatments have been done on stainless steel 316 samples. Hardness at 30µm and 100µm has been measured and the results are plotted on Figure 4 as a function of theta values measured with Eddy Currents instrument.
Description of Figure 4 can be done as follows:
Left part of the plot, for theta values above 150. NanoPeening® treatment time is not optimised, the nanostructured layer is under construction and the hardness values are increasing.
Right part of the plot, for theta values below 50. The blasting treatment is starting to deteriorate the surface of the part; the NanoPeening® treatment is too harsh.
Central section of the plot, for theta range [60; 140]. This is the area of interest for controlling the NanoPeening® treatment. One can observe a linear correlation between hardness and theta values in this area. It is interesting to note that in this range, the tracking of theta is a precise parameter to follow NanoPeening® treatment more precisely than the hardness values. Theta is given with error of ±5°, whereas hardness is determined at ±15Hv.
Conclusion
Eddy Currents inspection has been used to characterise NanoPeening® treatment on a metallic surface. The control can be qualitative to check the homogeneity of the treatment or quantitative to correlate with hardness increase. In the latter case, some preliminary correlations have to be established between the instrument reading and the material characteristics (hardness profile) to be able to use this non-destructive technique to control NanoPeening® treatment.
The case of stainless steel 316 is illustrated in this article, but upon request from the customer, Winoa is able to develop a non-destructive inspection of NanoPeening® treatment for other materials.
Acknowledgement
Winoa would like to thank Mr Marticou from Ugitech who provided material, and Dr John Rudlin from the Welding Institute (TWI) that advised us during this study.
Reference
[1] Traitement d'une surface d'une pièce métallique EP2721190 A1
[2] A Beginner's Guide to Eddy Current Testing, Dr. J. R. Rudlin, British Journal of NDT Vol. 31 n°6, June 1989
[3] Eddy currents and hardness testing for evaluation of steel decarburizing, D. Mercier, J. Lesage, X. Decoopman, D. Chicot, NDT & E International Volume 39, Issue 8, December 2006, Pages 652-660
[4] Improvement of heat treatments performance by a mechanical pretreatment of «NanoPeening®»: Case studies of nitriding and low pressure carbonitriding, T Muller, oral presentation A3TS 2012
For Information:
Winoa
528 Avenue de Savoie
38570 Le Cheylas, France
Tel. +33.476.92 92 36
Fax +33.476.92 92 29
E-mail: claire.vautrin@winoagroup.com
www.winoagroup.com
www.wabrasives.com


