E-Archive
Science Update
in Vol. 19 - September Issue - Year 2018
Comparison of Various XRD Methods on Evaluation of Residual Stress Introduced by Submerged Laser Peening

Fig. 1: Schematic diagram of submerged laser peening system

Fig. 2: Aspect of laser ablation and laser cavitation (λ = 1,064 nm)

Fig. 3: Signals of laser ablation and laser cavitation detected by PVDF sensor

Fig. 4: Direction of laser peening and direction of stress

Table 1: Residual stress of SKD61 (8 pulse/mm2 with tape, z = 212 μm)
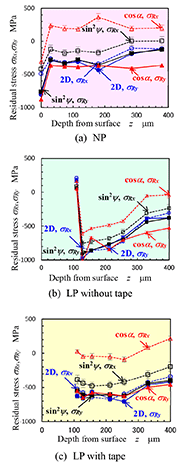
Fig. 5: Residual stress as a function of depth from surface
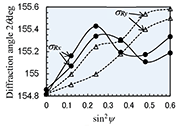
Fig. 6: sin2ψ - 2θ diagram of SKD61 (8 pulse/mm2 with tape, z = 400 μm)
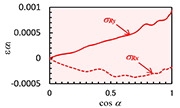
Fig. 7: cosα - εα1 diagram of SKD61
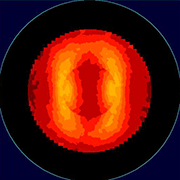
Fig. 8: Pole figure of SKD61 (NP, z = 380 μm)

Table 2: Residual stress of SUS316L (100 pulse/mm2 without tape, z = 39 μm)
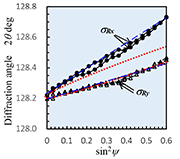
Fig. 9: sin2ψ - 2θ diagram of SUS316L (100 pulse/mm2 without tape, z = 39 μm)
Introduction
In order to improve fatigue strength and/or fatigue life, mechanical surface treatments such as shot peening, laser peening, water jet peening and cavitation peening [1] have been proposed. One of the important factors on improvement of fatigue properties is compressive residual stress; furthermore, tensile residual stress introduced by welding or grinding is one of the reasons for stress corrosion cracking. Thus, evaluation of residual stress is very important.
One of the conventional methods to evaluate residual stress is the X-ray diffraction XRD method. Several methods such as the sin2 ψ method, cos α method and 2D method have been proposed. Each method is based on each theory, and each method has advantages and disadvantages. It was reported that the residual stresses measured by the cos α and sin2 ψ methods were similar in the case of steel SM490 but the evaluated values of SUS316L were different [2]. They concluded that the reason of the difference on SUS316L was caused by the difference of X-ray tubes [2].
In the case of the XRD methods, the evaluation of residual stress of the materials with large grain, textured materials and materials with steep stress gradient were difficult. In the case of shot peening and cavitation peening, plastic deformations were produced randomly. Thus, the introduced compressive residual stress by shot peening and cavitation peening produced rather equiaxial stress conditions. On the other hand, in the case of laser peening, plastic deformations were introduced systematically, that might produce texturing patterns and anisotropic stress conditions, further causing difficulty of evaluation of evaluate residual stress, producing differences which depended on the evaluation methods.
In the present paper, in order to show the comparison of various XRD methods on evaluation of residual stress introduced by laser peening, specimens were treated by submerged laser peening, and the residual stress was evaluated by the sin2 ψ method, cos α method and 2D method.
Submerged Laser Peening
Figure 1 illustrates used a submerged laser peening system. It was reported that the impact in the material produced by bubble collapse was larger than that of laser ablation [1]. In the present paper, the bubble after laser ablation is named as laser cavitation, as impact is produced at bubble collapse as same as cavitation bubble. In the case of conventional submerged laser peening, second harmonic of Nd:YAG laser, i.e., 532 nm in wave length λ, has been used to avoid attenuation by water [1, 3]. However, in the case of the research on bubble dynamics, fundamental harmonic, i.e., 1,064 nm in wave length is used due to heat concentration. In the present experiment, the fundamental harmonic was used by optimizing the standoff distance in water, as 40 % of source power is lost to obtain second harmonic of Nd:YAG laser. Note that it was already demonstrated that the compressive residual stress was introduced into tool alloy steel by the submerged laser peening using fundamental harmonic Nd:YAG laser [4]. The maximum energy, the pulse width and the repetition frequency were 0.35 J, 6 ns and 10 Hz, respectively.
Figure 2 reveals the aspect of the laser ablation and laser cavitation by observing a high speed video camera, and Fig. 3 illustrates the output signal from the PVDF sensor which was recoded in synchronicity with the high speed video camera [4]. After laser ablation, a bubble was generated, developed, shrunk and collapsed at t = 1 ms then rebounded. As shown in Figs. 2 and 3, the impacts were produced by laser ablation at t = 0 ms and collapse of laser cavitation at t = 1 ms as the same as λ = 532 nm [1]. Note that the impact generated by the laser cavitation was 1.3 times larger than that of laser ablation.
Evaluation of Residual Stress by XRD Methods
In the present experiment, tool alloy steel Japanese Industrial Standards JIS SKD61 and SUS316L were used for the residual stress measurement. Figure 4 shows the direction of laser peening and direction of stress. In the case of SKD61, it was heat-treated by heating at 1073 K for 80 minutes, 1223 K for 10 minutes and 1298 K for 1.5 hours, quenched with gas, and then tempered at 823 K for 2 hours and 793 K for 2 hours. The surface of SKD61 was finished by grinding. In the case of SUS316L, the tempered plate without grinding was used.
In the present experiment, residual stress was evaluated by the 2D method, cos α method and sin2 ψ method. For all methods, Cr tube was installed in each XRD apparatus and Kα peak was used. In the case of 2D and sin2 ψ methods, the same XRD apparatus with 2D detector was used. The 2 θ diffraction angle of 156 deg for α-Fe (2 1 1) was used for SKD61 and 128 deg for γ-Fe (2 0 0) was used for SUS316L.
Figure 5 illustrates residual stress evaluated by 2D, cos α and sin2 ψ methods of SKD61 for (a) non-peened, (b) laser peening without tape and (c) laser peening with tape as a function of depth from the surface using electrochemical polishing [5].
As shown in Fig. 5 (a), the compressive residual stresses were introduced into subsurface by grinding. Thus, the thickness of about 100 μm was removed by electrochemical polishing before laser peening. At laser peening, the specimen was treated twice at 4 pulse/mm2; namely, total pulse density was 8 pulse/mm2. For the reference, residual stresses of the laser-peened specimen at z = 212 μm were shown in Table 1. In the cases of σRy, the evaluated values by three methods were similar. However, the value of σRx varied with the method. In the case of the 2D method, σRx was similar to σRy; for the sin2 ψ method, σRx was slightly larger than σRy; while for the cos α method, σRx was much larger than σRy, compared with the other methods.
As shown in Fig. 5 (b), in the case of the laser peening without tape, residual stress near sub-surface was tensile, but the compressive residual stress was introduced at z > 30 μm. The introduced compressive residual stress was about 400 – 500 MPa at z = 150 – 200 μm, compared with the non-peened specimen. In the case of the laser-peened specimen with tape, the compressive residual stress was introduced at the surface and in the deeper region. The used tape was black aluminum tape of 80 μm in thickness. Compressive residual stress of about 300 MPa was introduced by the laser peening with tape, even though the pulse density was 8 pulse/mm2 with only 0.35 J/pulse. The tendency of the difference between the various XRD methods on the laser-peened specimen was similar to that of the non-peened specimen.
In order to investigate the reason why evaluated residuals stresses varied by the methods, Fig. 6 shows the relationship between sin2ψ and 2θ of SKD61 at z = 400 μm treated by laser peening with tape at 8 pulse/mm2, and Fig. 7 illustrates cos α - εα1 diagram of non-peened SKD61 specimen at z = 380 μm. As shown in Fig. 6, the relationship between sin2ψ and 2θ of σRy shows a nearly straight line; however, the relationship of that of σRx reveals a wavy pattern. This is the reason why the compressive residual stress of σRx evaluated by the sin2ψ method is smaller than that of the 2D method. As the wavy patterns of +ψ and ψ show similar tendency, it is not caused by ψ sprit. In the case of the sin2ψ method, the residual stress is evaluated by the slope of the relationship between sin2ψ and 2θ. Thus, the residual stress might be incorrect, when the relationship between sin2ψ and 2θ is not straight. Note that the relationship between sin2ψ and 2θ should be checked by measuring with +ψ and ψ directions. As shown in Fig. 7, the relation between cos α and εα1 of σRy is nearly straight, but the relation of that of σRx is curved. This is the reason why the residual stress of σRx evaluated by the cosα method shows tension, although those of 2D and sin2ψ methods show compressive residual stress. In the case of the cos α method, the residual stress is evaluated by the slope of cos α and εα1. Thus, when the relationship between cos α and εα1 is not straight, the obtained residual stress is doubtful. Namely, when cos α method is used, the relation between cos α and εα1 should be checked.
As shown in Fig. 5 (a) – (c), the difference, which depends on the XRD methods, at z = 150 – 200 μm is remarkable. At z = 150 – 200 μm, each value of residual stress measured by each XRD method is nearly stable. Namely, the differences are not affected by the penetration depth, which depends on the XRD methods. Note that the used X-ray tubes of each XRD method are the same, i.e., Cr tube.
In order to investigate the reason for wavy patterns of diagrams of sin2ψ - 2θ and cos α - εα1, the pole figure of non-peened SKD61 at z = 380 μm is shown in Fig. 8 [6]. As shown, the measured material was not uniform; namely, the used material had a texture. This is the reason why the residual stresses measured by various XRD methods varied.
In order to examine differences of XRD methods on evaluation of residual stress introduced by the laser peening, the residual stresses measured by 2D and sin2ψ methods are shown in Table 2. The specimen made of stainless steel JIS SUS316L was treated at 100 pulse/mm2 without tape. After the laser peening, the surface was removed 39 μm by electrochemical polishing. As shown in Table 2, compressive residual stresses of both σRx and σRy evaluated by the sin2ψ method are 100 MPa smaller than that of the 2D method. In other words, the compressive values of σRx and σRy evaluated by the 2D method is 122 % and 140 % larger than those of the sin2ψ method respectively.
Figure 9 illustrates the sin2ψ - 2θ diagram of SUS316L specimen of z = 39 μm after the laser peening at 100 pulse/mm2 without tape. In Fig. 9, for reference, the straight lines for σRx and σRy are plotted and the semi-elliptical line for σRy is also illustrated. As shown in Fig. 9, the relationship between sin2ψ - 2θ for both σRx and σRy are curved. This might be the reason why the compressive residual stress measured by the sin2ψ method was 100 MPa smaller than that of the 2D method. As the relationship between sin2ψ - 2θ of both +ψ and ψ directions were similar, the curves were not caused by ψ sprit. Namely, systematic plastic deformation caused by the laser peening might produce texture.
Conclusions
In order to compare various XRD methods which evaluate residual stresses, tool alloy steel and stainless steel was treated by submerged laser peening and the residual stress was measured by the sin2 ψ method, cos α method and 2D method. The evaluated values varied, especially when textured material was measured. The laser peening might produce texture due to systematic plastic deformation. When sin2 ψ and cos α methods are used, diagrams of sin2ψ - 2θ and cos α - εα1 should be checked.
Acknowledgement
This work was partly supported by JSPS KAKENHI Grant Number 17H03138. The author thanks Mr. M. Mikami, technician, Tohoku University for his help with the experiment.
References
[1] H.Soyama, "Key Factors and Applications of Cavitation Peening," International Journal of Peening Science and Technology, vol. 1, no. 1, pp. 3-60, 2017.
[2] A. Kohri, M. Nakashiro, Y. Takaku et al., "Evaluation of Residual Stress Measured Using cos α and sin2ψ Method in the Elastic Region in Four-point Bending Testing," Proceedings of 48th X-ray Study of Mechanical Behavior of Materials pp. 22-25, 2014.
[3] H.Soyama, "Mechanical Surface Treatment of Duralumin by Laser Abrasion and Laser Cavitation," Metal Finishing News, vol. 17, No. 4, no. 4, pp. 56-59, 2016.
[4] H.Soyama, "Introduction of Compressive Residual Stress into Alloy Tool Steel by Submerged Laser Peening Utilizing Laser Cavitation Impact," Proceedings of the 9th International Conference on Leading Edge Manufacturing in 21st Century, LEM 2017, Article number 010, 2017.
[5] H.Soyama, "Evaluation of Compressive Residual Stress of Tool Alloy Steel by Various X-ray Diffraction Methods" Journal of Shot Peening Technology of Japan, vol. 30, no. 2, pp. 90-91, 2018.
[6] H.Soyama, and M.Sato, "Introduction of Compressive Residual Stress into Tool Alloy Steel by Submerged Laser Peening and its Evaluation Using X-ray Diffraction Methods," Journal of Shot Peening Technology of Japan, vol. 29, no. 3, pp. 132-138, 2017.
Department of Finemechanics
Tohoku University
6-6-01 Aoba, Aramaki, Aoba-ku, Sendai
980-8579, Japan
E-mail: soyama@mm.mech.tohoku.ac.jp


