E-Archive
Science Update
in Vol. 19 - November Issue - Year 2018
Radial Abrasive Waterjet Kerf Cutting of Titanium Alloys

Figure 1: Combining axial and radial AWJ kerf cutting to produce cylindrical shaft ends

Figure 2: Fundamentals of radial AWJ kerf cutting

Table 1: Parameter settings for the central composite design

Eq. 1

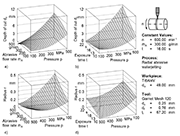
Figure 3: Surface plots; a) Depth of cut dc; b) Kerf ground radius r

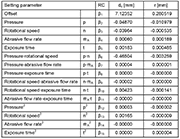
Table 2: Regression coefficients (RC) for the depth of cut dc and radius r
Introduction
Titanium alloys offer a high strength to density ratio and good corrosion resistance. Due to these properties, titanium alloys such as Ti6Al4V are commonly used in the aerospace industry and for automotive applications. During the last decades substantial advancements in high temperature performance and creep characteristics were achieved by refining titanium alloys. All kinds of titanium alloys, especially the refined alloys, are difficult to cut and alternative manufacturing chains, minimizing the cutting volume, have been investigated.
Abrasive waterjet (AWJ) cutting offers an alternative manufacturing method. The main advantages for using the AWJ are the high variety of machinable materials, the long tool lifetime, and the tools’ wear independent of the material being processed. A milling operation can be efficiently performed using an AWJ, when two kerfs of precise depths are superimposed [FAL18]. This idea can be transferred to a turning operation, by first cutting the radial into a rod and then the axial into the end face of the same workpiece; hence, the manufacturing of cylindrical shaft ends or cylindrical tubes becomes possible (Figure 1).
In this study, radial AWJ kerf cutting on Ti6Al4V was carried out and analyzed as a first step to the above described procedure. Unlike previous investigation by HASHISH and ANSARI [HAS95], the jet points to the centre of rotation. Figure 2 illustrates the principles of the radial AWJ kerf cutting process. As in conventional turning, the workpiece with an initial diameter dw rotates with a rotational speed n. The waterjet impacts the workpiece with a given pressure p and abrasive flow rate mA. The distance between the waterjet’s nozzle to the contact area increases during a cutting process from the initial distance s to the initial distance s plus depth of cut dc. Hence, the depth of cut dc is the most relevant parameter to evaluate the effect of the setting parameters. Moreover, the kerf ground waviness w, is a capable parameter to evaluate the evenness of the process. The kerf ground waviness w is the difference between the highest and the lowest distance to the center of rotation, figure 2.
The radius r at the kerf ground is another target value to describe the kerf in terms of the shape. For a given constant kerf width at the full diameter dw, high r values are connected to a wider kerf with steeper walls, while small r occur with narrower kerfs.
Experimental procedure
The experiments were conducted on the waterjet system HRX 160 L by MAXIMATORJET GMBH, Schweinfurt, Germany. The selected design of experiments contains a full central composite design of four factors, with two repetitions of the test plan and 14 repetitions of the centre point. The generated experimental design was structured according to the standardised test plan of MYERS [MYE09]. The tested parameters were the pressure p, the rotational speed n, the abrasive flow rate mA and the exposure time t (table 1). Further parameters such as orifice diameter do, focus length lf, focus diameter df, abrasive material and size were selected according to industrial standards (Figure 3) and kept constant throughout the experiments. Target values were the depth of cut dc and the kerf ground radius r.
The kerf ground radius r was analyzed with an O INSPECT 543 multi-sensor measuring device by CARL ZEISS INDUSTRIELLE MESSTECHNIK GMBH, Oberkochen, Germany. Other lengths and depths were measured with the 3D measuring device microProf 100 from FRT GMBH, Bergisch Gladbach, Germany. An empirical second order regression model, equation 1, was chosen to describe the target values. The model includes all linear main effects, first order interaction effects and the quadratic effects of all setting parameters. MATLAB and Statistics Toolbox Release 2015b, the MATHWORKS, INC., Natick, Massachusetts, United States, was used to calculate the beta values by minimizing the mean square error. To determine the significance of an effect, a standard confidence level of 95 % was chosen.
Results and discussion
In the experiments, kerfs with a depth of cut dc between dcmin = 0.35 mm and the dcmax = 8.68 mm were reached. The deepest depth of cut dcmax occurred for the highest pressure. The highest pressure also causes the highest kerf ground waviness of wmax = 537 µm. In consideration of an initial high waviness of the workpiece wini = 250 µm and the sudden end of the AWJ, leaving a step in the kerf ground, the highest kerf ground waviness w seems tenable. Furthermore, the smallest radius rmin occurs as well in combination with the highest pressure. The kerf ground radius r varies between rmin = 0.13 mm and rmax = 0.41 mm. All linear effects of the setting parameters were significant, except the rotational speed n.
The regression model, constructed according to equation 1 combined with the beta values in Table 2, enables the illustration of the results and an analysis of the occurring effects. The plots in figure 3 show the effect of two significant parameters on one target value, while the other two parameters remain constant. The Figure 3a depicts the depth of cut dc in dependence of the pressure p and the abrasive flow rate mA. In general, the depth of cut dc increases with higher pressures p. Moreover, when low pressures p are present, high abrasive flow rates mA cause low depths of cut dc, while for medium abrasive flow rates mA a maximum is reached. The maximum depth of cut dc shifts to a higher abrasive flow rate mA with an increasing pressure p. These effects reveal the increasing energy and material removal of the waterjet with increasing pressures p and the ability to accelerate more abrasive when more pressure and consequently more water flow is present. The exponential increase of the depth of cut dc demonstrates the increase of the AWJs’ dwell time when high depths of cut dc are reached. The increase of the dwell time is caused by a reduced feed speed that is eventually caused by the reduced remaining material closer to the center of rotation. Hence, the exponential increase of the depth of cut dc applies only for radial AWJ kerf cutting. Figure 3b shows the results for the depth of cut dc depending on the exposure time t and the pressure p. For medium pressures p an increase of the depth of cut dc can be observed. The exposure time t has a positive interaction with the pressure p leading to maximum depth of cut dc if both values are high. This effect is as well a result of the increased AWJs’ dwell time.
The kerf ground radius r in Figure 3c and figure 3d shows contrary behavior compared to the depth of cut dc. First, the radius r increases with lower pressures p. Second, a negative interaction between the pressure p and the abrasive flow rate mA can be observed in Figure 3c. The interaction leads to a maximum radius r for low pressures p with high abrasive flow rates mA and in addition to a local maximum at low abrasive flow rates mA with high pressures p. Parts of the observed behavior are related to the depth of cut dc. Deeper depths of cut dc occur with smaller radii r. However, the effects also reveal a more resilient waterjet for higher abrasive flow rates mA. Hence, more abrasive particles seem to form a more dense and homogenous waterjet.
In order to evaluate the quality of the model, the coefficient of determination of R² is considered. The second order model possesses a coefficient of determination of R² = 0.99 for the depth of cut dc. Hence, only 1 % of the observed results are allocated as an unexplained remainder of scattering. The coefficients of determination of the radius r show a higher, but still satisfactory, unexplained remainder of scattering (R² = 0.88).
Summary
By conducting the investigation, the range of AWJ operations were broadened. The radial AWJ tests allowed the manufacturing of a kerf in Ti6Al4V with a depth of cut of dc = 8.68 mm within t = 16 seconds for. Moreover, only a minor increase of the waviness w was observed. In addition, a regression model for the depth of cut dc and the radius r adequately describes the effects of the setting parameters to the target values. The high correlation between the results and the model allows a precise prediction of the depth of cut dc. In addition, the derived models provide a foundation for a combined process of axial and radial kerf cutting and hereby an efficient turning operation for AWJ. This approach broadens the manufacturing techniques for titanium alloys by a low wear cutting operation.
Acknowledgments
This paper is based on results acquired in the project DFG UH 100/206-1, which is kindly supported by the Deutsche Forschungsgemeinschaft (DFG).
References
FAL18 Faltin, F.: Endkonturnahe Schruppbearbeitung von Titanaluminid mittels Wasserabrasivstrahlen mit kontrollierter Schnitttiefe. Berichte aus dem Produktionstechnischen Zentrum Berlin. Hrsg.: Uhlmann, E. Dissertation, Technische Universität Berlin. Stuttgart: Fraunhofer IRB, 2018.
HAS95 Hashish, M., Ansari, A.: Erosion modes during AWJ lathe slotting. ASME Manufacturing Science and Engineering MED-Vol. 2-2 (1995), S. 1263 – 1269.
MYE09 Myers, R., Montgomery, D., Anderson-Cook, C.: Process and Product Optimization Using Designed Experiments. Response surface methodology. New Jersey: Wiley, 2019.
Institute for Machine Tools and Factory Management, Technische Universität Berlin,
Pascalstraße 8-9, 10587 Berlin, Germany


