Ball bearings consist of round balls held between an inner and outer ring (Figure 1), and they are mainly used to facilitate rotational movement. They can often be found in safety-critical or life-limiting components, such as in aircraft, automobiles, and home appliances. The balls within these bearings are important because they reduce the overall wear and tear on components, drastically extending the fatigue life of the products in which they are used. As such, they must be manufactured in a meticulous, systematic process to eliminate the possibility of imperfections that may result in premature failure.
To fabricate the balls used in bearings, steel wire is cut into pieces, which are then formed in a die to create rough ball shapes. Subsequently, several processes smooth the balls out further and ensure that they have a mirror finish (Figure 2). Once the proper shape and finish have been achieved, the balls are hardened via heat treatment processes.[1] Finally, the steel balls undergo several quality-assurance checks to confirm their uniformity and suitability for their intended application. These careful manufacturing measures help to ensure that the desired performance characteristics are imparted into the bearings, thus enhancing the safety of the components in which they will be used. If the desired shape, physical properties, and metallurgical characteristics of the balls are not attained, the bearing could be compromised in terms of both safety and efficiency.
However, despite the extensive efforts taken to ensure that balls are created with the proper shape, size, and finish, steel balls may still experience decreased effectiveness or longevity. This is because the methods used in their manufacturing, as well as in other processes designed to achieve the desired mechanical properties and microstructure prior to use, may result in the presence of undesirable residual stress (RS). RS is the stress present in an object in the absence of any external loads. This type of stress is created in the manufacturing process whenever the part undergoes plastic deformation. RS may affect the performance of a part and can be either favorable or harmful depending on the magnitude and sign of the stress. Tensile RS tends to result in cracking and is more likely to lead to early failure of a component, whereas compressive RS tends to increase fatigue strength, fatigue life, and resistance to cracking. [2]
In the case of the balls used in ball bearings, it is highly important to characterize the residual stresses present throughout the entire sphere because of the non-uniform way in which they are formed. As a result of the manner in which steel balls are cut from wire and then pressed into spheres, the finished products have “poles” (Figure 2). These poles and their surrounding regions can have different material properties (including RS, percent retained austenite, and dislocation density) than other regions of the sphere, making it extremely important to be able to locate these poles non-destructively. This information can help manufacturers better predict fatigue life, minimize failures, optimize fabrication, enhance metallurgical characterization, and locate potential problem areas resulting from use.
There are several methods that can be used to determine the RS in a sphere. Finite element analysis (FEA) can predict stresses by calculation, but its accuracy is strongly dependent on a priori knowledge of precise material properties, and more importantly, the suitability of the assumptions made regarding the hot and cold working processes the ball undergoes during fabrication and processing. Other RS measurement methods such as slitting or hole drilling can sometimes be applied; however, they are destructive and rely on elastic recovery. Since the RS in bearing balls is often relatively high compared to the material’s yield strength, recovery due to sectioning is often inelastic, so there is a high risk that measurement results obtained using these methods will be erroneous. The x-ray diffraction (XRD) method offers a better solution: it is non-destructive at the surface, thus allowing for the continued use of the part after measurements are completed, and it does not rely on elastic recovery, so it is accurate even when the RS present is greater than the yield strength of the material. XRD is commonly applied for the measurement of RS in many industries, including automotive, aerospace, and energy, to ensure suitable RS has been imparted to critical areas of components that may be susceptible to stress-related failures.
RS measurements using XRD are often performed at critical areas on the part, the locations of which are usually chosen based on observed cracking or deformation, the results of other RS studies, or the results of predictive studies such as FEA. However, in the case of bearing balls, their apparent homogeneity and symmetry when viewed with the naked eye makes identifying locations with RS issues nearly impossible. Only a complete RS map of the entire surface can ensure that areas of interest or undesirable RS are not missed. As such, XRD is well suited for mapping the RS present in a spherical object. XRD can be used to measure/sample RS with spot sizes as small as 0.5 mm in diameter, enabling the collection of very detailed RS maps. This eliminates the need to average results over large areas and facilitates the capturing of any surface RS gradients that may be present.
The XRD method uses the distance between crystallographic planes (d-spacing) as a strain gauge and can only be applied to crystalline, polycrystalline, and semi-crystalline materials. [2] When the material is in tension, the d-spacing increases, and when the material is in compression, the d-spacing decreases. The presence of RS in the material produces a shift in the XRD peak angular position that is directly measured by an x-ray detector. [3]
For any integer multiple (n) of a known x-ray wavelength (λ), the diffraction angle (2θ) is measured experimentally, and the d-spacing is then calculated using Bragg’s law:
(1)
Once the d-spacing is measured for unstressed (d0) and stressed (d) conditions, the strain (ε) is calculated using the following relationship:
(2)
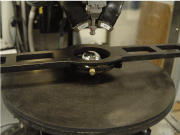
In order to get automated, efficient results that provide an accurate representation of the RS state of a spherical object, special equipment is needed. For this reason, Proto developed a sphere mapping apparatus that holds spheres securely in place within an XRD RS measurement system (Figure 3). Movement of the high-friction surface causes the sphere to rotate, providing access to the locations to be measured, and a large number of locations can be measured automatically.
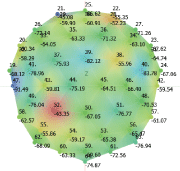
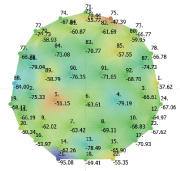
Figure 4 shows a graph of a RS map using measurements at 12 locations on the same 1.125” diameter steel ball, while Figure 5a shows a map created on the same sphere using measurements at 92 locations. It is clear that the 12-point map missed many areas of significant RS in the sphere. While the RS results in Figure 4 range from approximately -72 to -46 ksi, Figure 5a shows a much larger range: approximately -95 to -43 ksi. Therefore, using the sphere mapping apparatus to take measurements at many locations can provide a much more complete picture of the RS state of a ball bearing.
Sphere mapping is also a useful tool for locating stressed areas on a metal sphere that has been subjected to in-service usage or non-uniform plastic deformation/cold working. Figure 5b shows a RS map of the same 1.125” diameter sphere after it was scratched along a section of the surface to simulate non-uniform in-service usage. The location of the damaged area is clearly visible (shown below in blue), and the RS present in that area has been quantified. This application provides a useful tool in helping manufacturers understand where to purposely impart RS in a part, and when a part should be replaced.
There are numerous advantages to obtaining a full XRD RS map of a ball bearing or sphere. Mapping provides a thorough and complete characterization of the RS present over the entire sphere, allowing problem areas to be easily identified and subsequently corrected. For steel balls in particular, “poles” commonly resulting from product manufacturing can be located using a sphere mapping apparatus and subsequently corrected. Knowledge of the location and magnitude of these poles is crucial to ensuring product quality, longevity, and safety of use. Thus, this accurate and cost-effective RS mapping method can help ensure a greater reliability of the spheres used inside ball bearings.
References
1. P. Eschmann, L. Hasbargen, and K. Weigand. Ball and Roller Bearings: Theory, Design, and Application, 2nd ed, J. Wiley and Sons, 1985.
2. I.C. Noyan and J.B. Cohen, Residual Stress: Measurement by Diffraction and Interpretation, Springer-Verlag, 1987.
3. B.D. Cullity. Elements of X-ray Diffraction, 2nd ed., Addison-Wesley, 1978.
4. J. Lu et al., Handbook of Measurement of Residual Stress, Fairmont Press, 1996.
5. J. Pineault. M. Belassel, and M.E. Brauss. “X-Ray Diffraction Residual Stress Measurement in Failure Analysis,” ASM Handbook, vol. 11 (2002), pp. 484-497.
For Information:
Proto Manufacturing Ltd.
2175 Solar Crescent, Oldcastle, Ontario
Canada, N0R 1L0
Tel. +1.519.737.6330
E-mail: info@protoxrd.com
www.protoxrd.com


