1. Introduction
Laser shock peening utilizes laser-induced shock waves to modify surface integrity and improve fatigue life of components. Most of the current laser peening systems employ a nanosecond (ns) pulse laser with high pulse energy to induce compressive shock waves. These laser systems have a slow repetition rate (1-5 Hz), consume high power, and require a protective layer plus water overlay to confine plasma during peening [1], so the process has mostly been applied for high value components like aircraft engines, aerofoils and nuclear vessels where the cost of its implementation can justify its benefits. There is a huge opportunity for fast, low-energy peening processes for general purpose applications in automotive, medical, as well as manufacturing industries.
Ultrashort pulsed laser has high power density even at low-pulse energy due to extremely short interaction time with the material [2], so it can generate an intense shock wave in the material without the need of any confinement medium. Due to the short pulse duration of ultrashort pulses, the heat-induced effects are also minimal in comparison to ns pulse laser [3]; additionally, the ultrashort pulsed laser operates at high repetition rate (103-106 Hz), which makes the process faster than ns-pulsed laser (1-10 Hz). For example, an fs-pulsed laser with 10 kHz frequency and 0.1 mm spot size is roughly 2.8 times faster than ns-pulsed laser with 4 Hz frequency and 3 mm spot size to peen the same area; accordingly, ultrashort pulsed laser might be a good alternative for fast and efficient peening of components.
In this article, we present the results from an investigation of changes in surface integrity of steel by femtosecond (fs) laser peening under different coverage with the aim of understanding the underlying mechanisms that will be helpful in designing an efficient ultrashort laser peening system in the future.
2. Experimental methods
Coupons of AISI 420 martensitic stainless steel were used for the study. The femtosecond laser peening trials were conducted using Coherent Libra Ti:sapphire femtosecond laser system with 800 nm wavelength, 50 fs pulse width and 1 kHz repetition rate. The schematic illustration of experimental setup is shown in Fig. 1. All experiments were performed in air without the use of any protective overlay and confinement medium. The coverage was varied by scanning the laser beam spot across the surface multiple times (Table 1). The peened surfaces were analyzed using advanced microscopes, hardness indentation and X-ray diffraction (for residual stresses).
3. Results and Analysis
Fig. 2 shows a typical surface of the coupon after fs laser peening. The scan lines indicate surface ablation due to fs laser treatment. This is probably due to the peak power density during peening being higher than the ablation threshold of the steel [4]. A magnified image of the peened surface (inset of Fig 2) reveals the presence of surface nanoripples all over the surface. These nanoripples are formed due to the interaction of ultrashort laser pulses with surface plasmons [5]. Under high coverage, some micro-pits could also be observed on the surface as shown in Fig. 3. These pits must have formed due to incubation effect during multi-shot ablation, which results in damage accumulation [6]. This indicates that a low coverage might be better at achieving a smooth surface during peening.
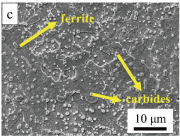
Cross-section observation of the fs laser-peened surface revealed some material removal by ablation (Fig. 4a). The microstructures of the steel near the peened surface and at the base region are shown in Figs. 4b and 4c respectively. The base microstructure is comprised of randomly distributed carbides in ferritic matrix. The laser-peened edge seemed to undergo rapid phase transformation, resulting in formation of martensite phase, while the carbides remained undissolved in the matrix probably due to the short interaction time of the fs laser beam.
Fig. 5 compares the hardness of the fs laser-peened surface under different coverage factors. It can be observed that after peening, the surface hardness increased compared to the as-received surface. This suggests microstructure refinement should have occurred after laser peening. From the results, the surface hardness was found to be directly proportional to the coverage factor, and a maximum hardness of about 229 HV was achieved for very high coverage of 7853%; however, the increment does not seem so significant, as the factor of uncertainty was as high as ±10 HV.
The results of surface residual stress measurements are shown in Fig. 6. The initial surface had a tensile residual stress of about +16 MPa. After fs laser peening at 981% coverage, the stress state changed to compressive with value reaching about -23 MPa. Further increment in coverage reduced the magnitude of compressive residual stress. Interestingly, at 3927% coverage (i.e. C3), the residual stress became completely tensile. Under even high coverage of 7853% (i.e. C4), the magnitude of tensile residual stress reached +23 MPa.
The residual stresses measured are quite low compared to yield stress of the steel (about 304 MPa)., and this might be due to the presence of other phenomena near the surface during laser-material interaction. In order to gauge the influence of fs peening in the sub-surface region, the residual stresses at different locations along the depth were measured (Fig. 7). It can be seen that for all cases, the maximum compressive residual stress occurred in the sub-surface region at the depth of around 5-25 μm. A sharp stress gradient near the surface suggests microstructural transformation has a dominant role in dictating residual stress state near the surface.
The details of such changes (recrystallization, dislocation density, phase transformation, etc.) could be explored further to understand the mechanism. Moreover, the peening effect quickly dissipated along the depth and virtually no effect was observed beyond 100 μm from the surface. It is also to be noted that the increase in coverage factor did not increase the depth of influence. Instead, higher coverage factor seemed to result in relaxation of maximum compressive residual stress in the sub-surface region.
4. Discussions
When an fs laser pulse irradiates a surface, the energy from the laser beam is absorbed by surface free electrons via inverse Bremsstrahlung process [7] and produces direct ablation. The material removal generates recoil shock waves in the material. It is this recoil shock wave that induces compressive residual stresses in the material. On the other hand, other competing mechanisms also exist. The energy from fs laser pulses also generates some thermal effect at the surface. The rapid heating and cooling induces quenching stresses, which are tensile in nature. In addition, martensitic transformation can occur in the steel surface, which produces compressive residual stresses, while various surface mechanisms such as nano-ripples, oxidation and filamentation can also occur during fs laser processing [8]. These result in tensile residual stress in the material, so the residual stress state is dictated by influence of all these factors.
In our experiments, for fs laser peening at relatively low coverage of 981%, the thermal effects and surface effects were dominated by beneficial compressive stresses induced by shock waves and martensitic transformation. As the coverage increased, the higher fluency available at the surface resulted in higher thermal stresses and surface effects, thus reducing the magnitude of compressive residual stress at the surface and in sub-surface region. At even higher coverage, the thermal effects were more dominant and tensile residual stresses were consequently recorded at the surface; however, the thermal effects cannot penetrate higher depth in the material and so compressive residual stresses were found in the sub-surface, albeit with lower magnitude. As a result, for the range of parameters chosen, low coverage of 981% achieved the best effect.
The study thus demonstrates that peening effect of an fs laser is dependent on a combination of multiple factors. A technique avoiding both thermal and surface effects should enhance the effectivity of fs laser peening.
5. Conclusions
The feasibility of fs laser peening to enhance surface integrity of steel was evaluated in this study. The results demonstrate that fs laser can induce peening effect on the steel surface; however, the magnitude and the depth of influence was found to be smaller than the conventional process, as a maximum compressive residual stress of about -80 MPa was measured and the depth of influence was roughly 100 μm.
The state of residual stress in the material was found to be determined by the combined effects of four main factors – (1) recoil shock wave due to material ablation (compressive); (2) thermal quenching due to rapid heating and cooling (tensile); (3) martensitic phase transformation (compressive); and (4) surface effects such as nano-ripples and oxidation (tensile). Both tensile and compressive residual stresses existed on the steel depending on the dominating effects of either of the above factors. Laser peening at relatively low coverage promoted shock wave effect and phase transformation resulting in overall compressive stresses. On the contrary, peening at high coverage increased thermal and surface effects producing overall tensile stresses. Further studies are being performed to achieve higher peening effect and minimize the deleterious effects of fs laser-material interaction.
References
1. C. S. Montross, T. Wei, L. Ye, G. Clark, and Y.-W. Mai, Int. J. Fatigue 24, 1021 (2002).
2. M. S. Brown and C. B. Arnold, Laser Precis. Microfabr. 135, 91 (2010).
3. R. Le Harzic, N. Huot, E. Audouard, C. Jonin, P. Laporte, S. Valette, A. Fraczkiewicz, and R. Fortunier, Appl. Phys. Lett. 80, 3886 (2002).
4. N. Maharjan, W. Zhou, and Y. Zhou, Surf. Rev. Lett. 26, 1850227 (2019).
5. J. Bonse, S. Höhm, S. V Kirner, A. Rosenfeld, and J. Krüger, IEEE J. Sel. Top. Quantum Electron. 23, 1 (2017).
6. N. Maharjan, W. Zhou, Y. Zhou, and Y. Guan, Appl. Phys. A 124, 519 (2018).
7. S. Nolte, C. Momma, H. Jacobs, A. Tünnermann, B. N. Chichkov, B. Wellegehausen, and H. Welling, JOSA B 14, 2716 (1997).
8. F. Pickhardt, J. S. Hoppius, and E. L. Gurevich, Procedia CIRP 74, 320 (2018).
The contents of this article have been published in Procedia CIRP, 87 (2020): 279-284; https://doi.org/10.1016/j.procir.2020.02.062. The author aims to bring technical results out of the paper to the attention of the MFN readers.
For Information:
aAdvanced Remanufacturing and Technology Centre, #01/01, CleanTech Two, 3 CleanTech Loop, 637143, Singapore
bDepartment of Electrical and Computer Engineering, National University of Singapore, 4 Engineering Drive 3, 117576, Singapore
cBeijing University of Technology, Institute of Laser Engineering, 100 Ping Le Yuan,
Chaoyang District, Beijing 100124, China
*Corresponding author
Tel. +65.6430.8428
E-mail: maharjan_niroj@artc.a-star.edu.sg


