E-Archive
Good Vibrations
in Vol. 23 - July Issue - Year 2022
The Fascination of Light and Truth – Controlling Good Vibes

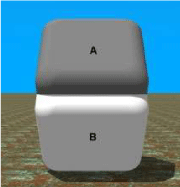
Picture 1: Colour and brightness of surfaces A and B are - the same!


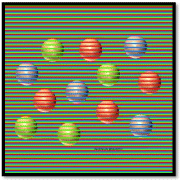
Picture 2: Nothing is moving, SIT down, keep cool. Right: every ball has the same colour

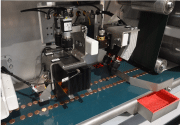
Picture 3: SIT 200 R Coin and Blank Inspection System

Picture 4: coin blanks under SIT material sensor control

Picture 5: the principle of 3D Laser Triangulation

Picture 6: the detailed beauty of a SIT generated coin part relief
The fundamental force of good vibrations in surface finishing technology is used to receive good results on surfaces of products. Here, top quality is usually the target of production output.
Optical control by human beings is often the most adequate and always available means to control quality. But that medium is a very cost expensive and at the same time a very inaccurate tool, especially when you have to deal with zero-error tolerance claims and time-critical processes and large quantities. Mechanical measuring devices often cannot handle large quantities in short cycle times, let alone in fully automatic modes.
Indeed, human perception is even often not only diverted, but is subjected to bias and noise. Intrapersonal noise is what you get when you try to measure 5 times a 10-second period of time with your mind. Your results will differ each time, although you are using the same mind, your own mind. You can test that with the timer on your smartphone by yourself. Have fun. Interpersonal noise is what you get when different people try the same experiment. Human judgement is noisy.
You may think at least what you see is the truth, but human perception was not build to explain or analyse reality; it was designed to survive within reality. On an industrial perspective, our mind and our perceptions are very uncalibrated measuring devices, and we should not base the survival of top quality on such devices, as reality is much too complex for our mind. Optical signals are interpreted and reduced to images before they reach our consciousness. When we look through our eyes we see a kind of simplified desktop interface of the world, like the simple one Apple has built on an iPhone in order to give human users the possibility to interact with an ultra-complex smartphone.
Try it yourself! Let’s say you have the simple quality control task to divide colours, or just simple brightness differences. Most of us sapiens are confident enough to tackle such a task, aren’t we? But take a closer look at picture one. Our brain is interpreting the physical electromagnetic wavelengths of surfaces A and B as being different - but they are not, these wavelengths of surfaces A and B represent the exact same colour. Our subconscious mind is gathering background information about the object, light, perspective, horizontal line etc. and is calculating a rated impression which previously was useful for the survival of our ancestors, who did not care about quality.
You can prove it by taking your finger and covering up the dividing line between areas A and B. Well, you may have the impression that the white area is getting grey, but it is still brighter than B, right? Now try to cover up the rest of the background and you will see that areas A and B have exactly the same colour and brightness. Don’t despair, it is not your fault, it is the software driver of your eyes that our evolution has given us. You cannot change it and hopefully you don’t want to change it.
But there is hope! Spaleck Inspection Technology is using different software and hardware, calibrated on a special mission in order to gain knowledge about the real physical properties of millions of workpieces.
In order to gain robust and reliable knowledge of product quality of surface finished parts, Spaleck Oberflächentechnik GmbH & Co. KG has invested massively in validation technology in 2022. The new branch is called Spaleck Inspection Technology (SIT) and is based on an overall concept for optical inspection.
Light of all wavelength is the only medium which gives us knowledge about the universe in astronomical spheres. Light is an enormously powerful and fascinating information channel. When we see a star as a white dot in the sky, from that single dot, an astrophysicist gets information about the size, the temperature, the distance, the material composition, the lifetime and even the history of this single star.
Spaleck Inspection technology is able to process from a minimal input of light in a minimal amount of time, the most critical quality features of a single workpiece.
In industrial terms, good results can be defined with detailed parameters. Parameters can be measured and parameters can be programmed in image analysis software. Image analysis software enables the checking of a picture pixel-by-pixel; that’s nothing you want to do by yourself, as analysing an image is computationally intense - so intense that it is time-consuming. Here, SIT is playing its trump card. By testing thousands of algorithms directly on different processor types, SIT is now using the optimal combination of algorithmic design and processor architecture with unprecedented speed.
SIT consists of the mechanical transportation system of workpieces, and the camera and analysing module, and both of the latter can be adjusted and adapted to specific customer needs. The system meets the market need for integrated production systems, where quality control is a self-evident part of production, and it is able to deliver 100% control including full digital documentation.
SIT is not only capable of using normal light but laser analysis as well, in order to perform 2D and even 3D camera technology, where 3D technology is able to measure exact geometrical features of a workpiece in milliseconds from both sides of a workpiece. SIT can even be equipped with further sensors to detect materials as shown in picture 4, for example.
Properties like color, discoloration, stains, surface defects, contour, alignment head and tail, diameter, height, ovality, concentricity, relief quality, relief height are only some examples of key features that can all be controlled. SIT will not only report bad parts, it will sort out these bad parts immediately.
Only with SIT can surface finishing become complete, as a surface is not finished if it was not observed, controlled and validated by SIT. A spot should be spotted by SIT and not by a customer complaint claim due to a product failure. Trust SIT; not your eyes.
Spaleck Oberflächentechnik
GmbH & Co. KG, Germany
Tel. +49.2871.9500.14
Fax +49.2871.9500.95
E-mail: m.geuting@spaleck.biz


