E-Archive
Articles
in Vol. 5 - July Issue - Year 2004
New XRD Technology can Eliminate Abusive Machining of Drilled Holes
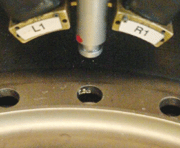
Figure 1a)
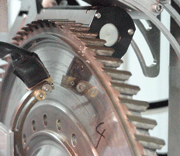
Figure 1b) Figure 1: Measuring residual stress a) on the face of machined holes using a conventional XRD instrument and b) on the i.d. of machined holes using a new XRD instrument.
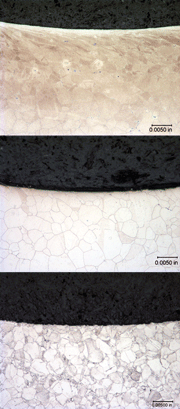
Figure 2: Cross sections (i.d. on top) of holes machined as follows: a) drilled with no coolant exhibiting severely distorted grains and undesirable microstructure at the surface, b) drilled with coolant and only slightly distorted grains near the surface, and c) drilled, honed and shot peened with no abusively machined material remaining.
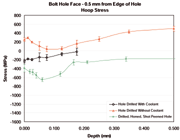
Figure 3a)
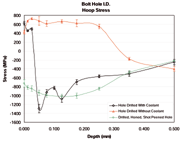
Figure 3b) Figure 3: Stress vs. depth profiles a) on the face of machined holes using a conventional XRD instrument and b) on the i.d. of machined holes using a new XRD instrument.
The residual stresses present in manufactured components, assemblies and structures can significantly improve or diminish their useful life. Proto Mfg. Ltd. has been helping companies for over 20 years with the measurement of residual stresses in the laboratory, on the shop floor and in the field by providing both sales of standard and custom instrumentation as well as measurement services.
A new XRD instrument(*) for use in the laboratory, on the shop floor and inline can measure residual stresses on the inner diameter of machined holes non-destructively.
Introduction
It is well known that machining operations produce surface conditions that can either enhance or reduce the fatigue life of production components. When surfaces are abusively machined, the resultant tensile residual stresses and microstructural damage often cannot be detected reliably by conventional NDT (non-destructive testing). This is because the damaged layer is generally extremely thin and below the resolution of conventional NDT. However, non-destructive surface residual stress measurements can detect process induced surface damage or abusive machining in very thin layers before cracking occurs. Furthermore, XRD (x-ray diffraction) technology has recently matured to the point of being able to measure locations of interest such as the i.d. (inner diameter) of machined holes rapidly and non-destructively.
New XRD Technology Can Eliminate Abusive Machining of Drilled Holes
Crack indications in turbine engine disks are currently detected by NDT during routine inspections after their use in engines. These crack indications often appear before their predicted fatigue lives have been surpassed. This is because there is no NDT method that can quantitatively detect the ‘abusive machining’ condition at the time of manufacturing or final inspection, thus, the abusively machined surfaces pass undetected into service. The tensile residual stresses associated with abusive machining are known to increase crack initiation and propagation rates, thus reducing the effective service life of critical components.
In the case of machined holes in nickel base super alloy turbine engine disks, severely worked surfaces of 0.005” to 0.010” (125 to 250 microns) deep are characteristic of abusive machining practices. An increase in hardness (5 to 15 HRC) can also be expected due to worked material produced by the hole manufacturing process. Due to the “line of sight” requirement of XRD, residual stress measurements have historically been limited to the face of turbine engine disks adjacent to machined holes. Furthermore, grain size effects and counting statistics considerations have often forced measurements to be performed with an x-ray beam size that is large relative to the abusively machined layer in the hole i.d. Thus, the residual tension in abusively machined layers on the i.d. of machined holes often could not be resolved upon XRD inspection.
With a clear need for improved, higher resolution NDT, a new XRD instrument was developed that can be used to measure residual stresses on the i.d. of machined holes non-destructively (see Figure 1).
Three examples of surface conditions that can be found on the i.d. of machined holes were investigated as follows: 1) a hole drilled with no coolant, 2) a hole drilled with coolant, and 3) a drilled, honed and shot peened hole (see Figure 2). Residual stress vs. depth profiles were collected on the face of each of the machined holes using conventional XRD instrumentation and on the i.d. of the same holes with a new XRD instrument. When comparing results collected on the face and the i.d. of machined holes, it was found that measurements performed on the i.d. were much more effective in detecting relatively thin tensile stressed layers (see Figure 3). Residual stresses that appeared compressive on the face were found to be tensile in the hole i.d. (in the case of the hole drilled with coolant). Tensile residual stresses found on the i.d. appeared diminished in magnitude when detected on the face (in the case of the hole drilled without coolant). Thus, the very steep stress gradients produced by machining demand non-destructive measurements on the i.d.
Current Methods of Hole Processing Can Benefit From XRD
Process development and subsequent process control using XRD residual stress measurements can be used to eliminate the practice of abusive machining in manufacturing. Typically, shot peening is specified on these surfaces in order to produce beneficial compressive residual stress values required for improved LCF (low cycle fatigue) life at critical locations. The presence, or lack thereof, of these beneficial compressive stresses can be measured inline on newly manufactured disks on a 100% basis to ensure that cold working processes have been correctly and thoroughly applied. Then, the occasional “anomalous” disks that did not receive satisfactory cold working treatment can be rejected and reworked. Additionally, it will facilitate inclusion of the surface-enhancement benefit into the fracture mechanics and LCF calculations for the disk design life. Neither of these benefits were previously possible. These benefits cannot be fully realized unless the compressive residual stresses are specified, quantified, and tracked by part serial number and controls put in place in manufacturing, MROs and service depots. With current equipment, surface residual stress measurements can now be performed non-destructively on the i.d. of machined holes in less than 1 minute making XRD a viable inline inspection tool.
The authors would like to thank Joe Bateman and the staff at Martin Metlabs Inc. in Stuart Florida for their assistance and metallurgical expertise.
For information: Proto Mfg. Ltd.
2175 Solar Cr., Oldcastle, Ontario
Canada, N0R 1L0
Tel. +1.519.737 6330, Fax: +1.519.737 1692
E-mail: proto@protoxrd.com
www.protoxrd.com


