E-Archive
Science Update
in Vol. 5 - September Issue - Year 2004
Surface and Subsurface Residual Stresses after Shot Peening – their qualitative and quantitative Analysis by X-Ray Diffraction and Barkhausen Noise Analysis

Author: Dr. Ir. (PhD) Andrzej Wojtas, born in 1958, studied Mechanical Engineering at the Technical University in Wroclaw (Poland) and Materials Engineering at the University of Technology in Delft (Netherlands). Wrote his master
Process specifications and working procedures widely used by the aerospace- and automotive industries require the surface treatment by shot peening and specify the process parameters such as shot type, Almen intensity or peening coverage. It is then commonly assumed that the results of a well-controlled process should be predictable and repeatable. But are they?
Introduction
Almen tests carried out in order to optimise and later to verify the peening parameters are a very indirect way of measurement. While they are performed on a strip of metal only similar in composition and elastic properties to that of the actual part to be peened, they almost never match all the important conditions of the process such as the shape of the real part or the residual stress prior to the treatment.
Consequently the residual stresses and their depth distribution after the shot peening may differ very significantly from those required by the designer. The only reliable way to verify that the treatment has produced the desired effect is to actually measure the stresses in the peened component.
Quantitative vs. Qualitative Stress Analysis
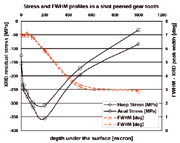
The conventional way of measuring the surface residual stresses is X-ray diffraction (XRD). It is a well-established quantitative, absolute method and provides accurate stress values. In shot peened components the beneficial maximum compressive stresses are beneath the surface and thus to verify the result of shot peening, evaluation below the surface is necessary. The measurement depth of the XRD method is limited to a few microns. To measure the subsurface stress by XRD requires successive electrochemical removal of material and repeated XRD measurements. Such a procedure is acceptable for laboratory evaluations on selected samples but it is not feasible for a 100% control of a shot peening process and besides, it cannot be considered non-destructive. Difficult to reach areas such as holes, fillets or roots of gears form an additional difficulty. The XRD is nevertheless irreplaceable in obtaining the true and complete picture of the effects of shot peening. Particularly, very steep stress gradients after shot peening of very hard steels are well resolved by this technique. It ought to be mentioned here that in addition to the stress profile also the effects of plastic deformation, work hardening or softening of the shot peened surface can be illustrated and quantified by the XRD measurement (fig 1.)
The drawbacks and limitations of the XRD technique can be bypassed by the use of a measurement technique based on the analysis of the magnetic Barkhausen noise (BNA). This measurement technique has been for many years widely used in the automotive and aerospace industries to non-destructively inspect the surface integrity of various components after heat treatment, turning, grinding or polishing.
The correlation between the Barkhausen noise and the fatigue strength of camshafts, gears, bearings, has been well documented and described in [1], [2], [3], [4].
The BNA method is well suited for both static and dynamic inspection of the surface. The measurement depth depends mainly on the permeability of the material and is typically 100-200 mm for surface hardened components. Since this depth is 10 to 100 times that obtained by x-ray diffraction, BNA is capable of quantifying the subsurface stress without the need of removing the surface layer. This fact has offered the possibility of detecting subsurface tensile stress in aerospace bearings; the technique is presently applied to test 100% of the production of certain bearing grades [2].
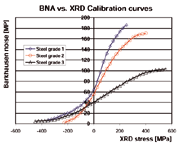
Residual stress measurement with BNA is based on the dependence between the material’s magnetic properties and elastic strains/stresses. Figure 2 shows an example of measured Barkhausen noise level as a function of stress (calibration curve). The Barkhausen noise level systematically increases with decreasing compressive stress and increasing tensile stress, provided that stress is within the elasticity limits of the material. If the material is deformed so that it work hardens or softens (as In shot peening), its elastic limits are changed and a different Barkhausen noise response to stress is obtained.
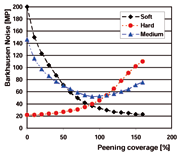
It has been shown [3] that the Barkhausen noise response to shot peening depends on the material. In relatively soft steels, the BN level consistently decreases with increasing shot peening intensity (figure 3); in very hard martensitic (carburised or surface hardened) materials, it increases. The former response reflects growing compressive stresses and work hardening in shot peening as predicted by figure 2; the latter can be explained in terms of microstructural changes and work softening occurring in the very near surface layers of the material. Within a certain medium hardness range, a combined (U-shaped) response is possible.
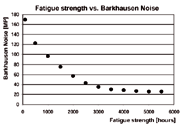
Barkhausen noise can be calibrated against the Almen intensity or against the residual stress e.g. measured by XRD (figure 2), or it can be used qualitatively. It can also be directly correlated with the component fatigue life (figure 4) – such calibration would however require time and labour consuming experiments.
BNA instruments developed and produced by Stresstech Oy are well suited for production and quality control environment. The testing is non-destructive and can be either static or dynamic depending on the requirement. Various kinds of scanning heads are presently available so that difficult to reach areas (like holes, fillets and gear roots) can be inspected. The method can be applied to ferromagnetic materials only.
Measurement of Stress Profiles
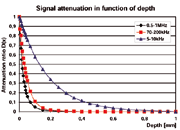
Barkhausen Noise has a power spectrum starting from the magnetising frequency and extending beyond 1 MHz in most materials. It is exponentially attenuated as a function of distance it has travelled inside the material. This is primarily due to the eddy current damping experienced by the propagating electromagnetic fields created by domain wall movements. The extent of damping determines the measurement depth. The depth of measurement depends on: magnetic permeability and the electric conductivity of the material as well as on the analysed frequency band of the recorded Barkhausen noise.
A formula for the calculation of the damping function D(x) has been proposed by Tiitto and Säynäjäkangas [5]. They assumed harmonic wave propagation in a half space medium:
“The mathematical formula can not be displayed in the web version of the article”
where H0 and H(x) are the field amplitudes at depths 0 and x respectively, m is the material permeability, s the material conductivity and f the analysis frequency.
For a given frequency band f1 – f2 an event characterised by a frequency spectrum g(f) and occurring at a depth of x millimetres will be damped at a rate D(x) given by:
“The mathematical formula can not be displayed in the web version of the article”
An example of three signal-damping curves calculated for hardened steel for three frequency bands is shown in figure (5).
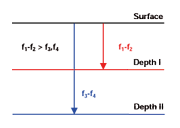
For given electromagnetic properties of the material (µ,s), fixed magnetisation frequency and a fixed damping ratio (D(x)) higher or equal to 37 % (equal to 1/e where e = natural logarithm base), the nominal depth of measurement (x) can be varied by the selecting the analysed frequency band (f1 - f2).
With the above model it is possible to calibrate the BNA method against e.g. X-ray diffraction. The wide band Barkhausen noise spectrum is measured on a shot peened sample and analysed in a range of frequency bands. For each frequency band the signal is analysed for a surface layer stretching from 0 to the nominal depth x as shown in figure 6.
For a calculated depth of measurement, we can then correlate the measured level of Barkhausen noise with a residual stress profile measured by XRD and incremental material removal.
Industrial Applications
The industrial applications of BNA for residual stress evaluation in shot peened parts may be divided into two groups:
1. Qualitative inspection e.g. sorting between peened / non-peened components, inspection of full coverage after shot peening.
Several automotive companies have implemented the BNA method for fast sorting of engine components to make sure all have been shot peened and have received the full coverage. This kind of inspection can be easily automated and the go/no-go condition can be established by both relative and absolute reference methods (Almen test or XRD measurements).
Shot peening using a manual tool is routinely used in a chemical plant to treat weld seams of ammonia storage tanks. The user has learnt that the stress corrosion can be drastically slowed down if in addition to stress relieving the heat affected zone sufficient compressive stresses are induced in and around the weld seam. Since the peening operation is done manually the coverage has to be well controlled. Throughout the process the operator of the peening device can scan the treated area and verify his work.
2. Quantitative measurement e.g. optimisation of the shot peening treatment, evaluation of residual stress profiles after shot peening.
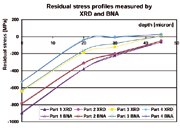
Suppliers of critical components for the aerospace industry are obliged to verify and guarantee that the surface residual stresses conform to a specification. The latter often requires that a stress profile be verified down to a depth of several tenths of microns – a depth beyond the reach of XRD. That is if the measurement is to be performed non-destructively. Jacob and Marrone [7] have calculated and later calibrated their Barkhausen noise instrument to measure accurately a stress profile obtained by shot peening to a depth of 45 mm. Figure 7 illustrates four stress profiles generated by different shot peening conditions. Each sample has been measured with both XRD and BNA. The agreement between the respective profiles indicates that the BNA method is capable of delivering quantitative information about the shot peening process.
Conclusions
1. It is vital to verify the effects of the shot peening treatment by residual stress measurement on the actual component.
2. X-ray diffraction method can provide absolute and quantitative information about the residual stress profile as well as about the degree of plastic deformation / work hardening of the shot peened surface.
3. The Magnetic Barkhausen Noise Analysis method can be used for fast (scanning) measurement of shot peened surfaces for the purpose of sorting and or evaluation of peening coverage.
4.The Magnetic Barkhausen Noise Analysis can also be used for quantitative evaluation of the shot peening process. Once calibrated against e.g. the X-ray diffraction method it can then be used for fast and accurate method for evaluation of residual stress profiles.
References
[1] R.M. Fix et al., “Automated Control of Camshaft Grinding Process by Barkhausen Noise” Materials Evaluation, Vol. 48, July 1990, p. 904.
[2] C.A. Griffiths “Closing the Loop on Product Integrity on Bearings with Engineered Source Approval” Split Ballbearing Features, Company Newsletter, July 1989.
[3] K. Tiitto et al., “Testing Shot Peening Stresses in the Field” The Shot Peener, Vol. 4, 1991.
[4] S. Tiitto S., A.S. Wojtas “Future of Residual Stress Testing in Shot Peened Parts during Processing” SURFAIR IX - 9th International Conference on Surface Treatments in Aeronautic and Aerospace Industry, Cannes - France 3-5 June ’92
[5] S. Tiitto, R. Säynäjäkangas “Spectral Damping in Barkhausen Noise” IEEE Transactions on Magnetics, VOL. MAG-11, NO.6, November 1975.
[6] S. Tiitto “On the influence of microstructure on magnetization transitions in steel”, Acta Polytechnica Scandinavica, Applied physics series No. 119, Helsinki 1977.
[7] P. Jacob, S. Marrone “Non-destructive Evaluation of Residual Stress Depth-profiles by Barkhausen Noise Analysis and their Validation by XRD Method Combined with Electrochemical (destructive) Surface Removal” 4th International Conference on Barkhausen Noise and Micromagnetic Testing July 3 – 4, 2003, Brescia – Italy
Head of European Operations
Stresstech Oy
Postbus 448, NL-2600 AK Delft, Netherlands
Tel. +31.15.262 1663
E-Mail: andrzej.wojtas@stresstech.fi
www.stresstechgroup.com


