E-Archive
Articles
in Vol. 6 - January Issue - Year 2005
MFN introduces a Hands-on Training on Residual Stress Measurement by X-Ray Diffraction

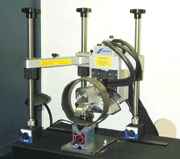
Fig. 1 Portable X-ray diffractometer

Fig. 2 Residual stress profile in a shot peened gear


Düsseldorf Workshop participants will have an opportunity to learn and practice the technique of X-ray diffraction and measure the residual stresses induced by shot peening.
Many surface treatment specifications used by the aerospace and automotive industries require well defined levels of residual surface and sub-surface stresses. While the Almen test can be used for the optimisation and verification of peening coverage and intensity, the actual effects such as the induced residual stresses and the degree of strain hardening have to be measured.
The training program of the MFN Düsseldorf Shot Peening Workshop includes a lecture by Dr. Andrzej Wojtas, on the measurement of residual surface stresses induced by shot peening. In addition to the training MFN has invited Dominik Dapprich of Stresstech GmbH to provide a portable X-ray stress analyser and a Stresscan instrument (Barkausen Noise Analyser) for a demonstration and a hands-on training for the workshop participants.
X-ray diffraction (XRD) is a well-established quantitative, absolute measurement method and provides accurate stress values. In shot peened components, the beneficial compressive stresses are beneath the surface. To verify the result of shot peening, evaluation below the surface is necessary.
The measurement depth of the XRD method is limited to only a few microns. Therefore the surface to be measured must be cleaned by electrochemical polishing – a method which does not modify or induce additional stresses as in case of abrasive cleaning. To measure the subsurface stress by XRD requires successive electrochemical removal of thin material layers and repeated XRD measurements.
Since such a procedure for the measurement of residual stress profiles cannot be considered non-destructive it is acceptable only for laboratory evaluations on selected samples, but is not feasible for a 100% control of a shot peening process.
This limitation of the XRD technique can be bypassed by the use of a measurement technique based on the analysis of the magnetic Barkhausen noise (BNA).
This measurement technique has, for many years, commonly been used in the automotive and aerospace industries to non-destructively inspect surface integrity of various components after heat treatment, turning, grinding or polishing.
Head of European Operations
Stresstech Oy and Scientific Adviser of MFN
Tel. +31.15.262 1663
E-Mail: andrzej@mfn.li


