E-Archive
Cover Page
in Vol. 8 - January Issue - Year 2007
Preventing Fatigue Failures with Laser Peening
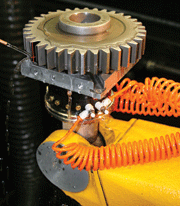
Figure 1: A spur gear being laser peened in the process cell

Figure 2: Schematic of the laser peening process
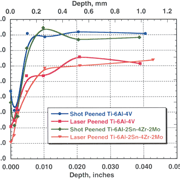
Figure 3: Residual stress profiles for laser peened and shot peened titanium alloys
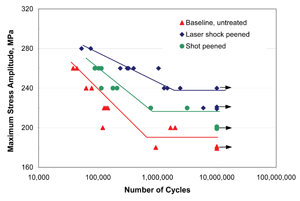
Figure 4: Comparison of laser peening and shot peening fatigue properties for 7075-T7351 aluminum (Data points with arrows indicate tests halted with no failure.)
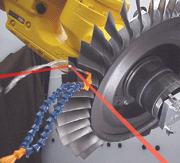
Figure 5: Laser peening of an IBR for the F-119-PW-100 engine. The red laser beams were added schematically to illustrate the process. The actual laser peening pulses are in the infrared spectrum (not visible to the human eye)
Introduction
Laser peening is a surface enhancement process used to increase the fatigue resistance of metallic components. The process creates residual compressive stresses deep into the surface of a part surface - typically five to ten times deeper than conventional metal shot peening. These compressive surface stresses inhibit the initiation and propagation of fatigue cracks. Laser peening has been particularly effective in aircraft engine titanium alloy fan and compressor blades, however the application of this process is much broader, encompassing automotive parts, orthopedic implants, tooling and dies, and more. An example of a gear being processed is shown in Figure 1. Typically, it is used on critical areas of a part where traditional surface enhancement processes do not provide sufficient benefit. Laser peening may also be referred to as laser shock processing (LSP), and various other commercial trade names.
How Laser Peening Works
Laser peening drives a high amplitude shock wave into a material surface using a high energy pulsed laser. The effect on the material being processed is achieved through the mechanical "cold working" effect produced by the shock wave, not a thermal effect from heating of the surface by the laser beam.
The laser system is a high-energy, pulsed neodymium-glass laser system having a wavelength of 1.054 µm. The laser peening system produces very short laser pulses, selectable from 8 to 40 nanoseconds, with a pulse energy of up to 50 joules. The laser spot is typically 5-6 mm in diameter. Laser peening parameters are typically selected to achieve a power density or laser irradiance of 5-10 GW/cm2.
To prepare a part for laser peening, an overlay opaque to the laser beam is applied to the material surface being treated. An additional layer, transparent to the laser beam, is placed over the opaque overlay. With the two overlays in place, the laser pulse is directed through the transparent overlay and interacts with the opaque overlay as shown in Figure 2. The interaction consists of the laser energy being absorbed in the first few micrometers of the opaque overlay surface, vaporizing the material and forming a plasma. The plasma temperature rises rapidly through further heating from the incoming laser beam, but thermal expansion of the plasma is limited by the transparent overlay material. The pressure in the confined plasma increases rapidly, causing a shock wave to travel into the material through the remainder of the opaque overlay, and outward through the transparent overlay material.
The opaque overlay serves to protect the part’s surface from direct thermal contact with the laser-induced plasma, and provides a consistent surface condition for interaction with the laser beam, independent of the actual material being treated. Direct contact of a metal surface with the plasma will, in most cases, form a thin melt layer on the surface of the metal, ranging from a surface discoloration to a surface melt layer up to 15 to 25 µm thick, depending on the laser irradiation conditions and metal properties. Opaque overlays can be of a variety of forms; dry or wet paint, black tape, metal foils, and adhesive-backed metal foils have all been used with varying, but nominally equivalent results in terms of the pressure pulses generated.
The transparent overlay serves to confine the plasma generated at the surface of the opaque overlay against the surface being treated and can be any material transparent to the laser beam. The simplest and most cost-effective method is to flow water over the surface from an appropriately placed nozzle. The water is not used to cool the part but serves the key function of confining the plasma generated when the laser beam interacts with the opaque overlay surface. The confinement increases the pressure developed by the plasma on the surface up to 10 times over the surface pressure developed if the plasma is unconfined and allowed to accelerate away freely from the material surface.
In practice, the laser system is located next to a peening cell in which the parts are robotically positioned during processing. The size of the area to be treated depends on the part design and service conditions. Sometimes, a part requires that only a small area be treated and a single treated spot will suffice, for example, around small bolt holes, or at the root of a notch in the side of a thin section. In other instances, the areas requiring treatment will be larger, such as a patch on a turbine blade, crankshaft fillet, or gear. In these cases, successive spots are overlapped until the desired region is completely covered.
The shock wave traveling into the material being processed is the means for enhancing material properties. If the peak pressure of the shock wave is above the dynamic yield strength of the material, it will cause dynamic yielding as it travels into the material. The yielding of the material introduces tensile plastic strain in the plane of the surface, creating a residual compressive stress. As the peak pressure of the shock wave decreases with distance into the material, the total plastic strain associated with the shock wave decreases. This plastic strain gradient gives rise to the compressive stress gradient below the surface. Because the plastic strain produced by the shock wave extends much deeper then that produced by conventional shot peening, the compressive residual stresses produced by laser shock peening also extend deeper into the material. The deeper residual stresses, in general, provide much more substantial property benefits.
Material Property Enhancements
Residual Stress
Laser peening produces a number of beneficial effects in metals and alloys. Foremost among these is increasing the resistance of materials to surface-related failures, such as fatigue, fretting fatigue and stress corrosion cracking. Numerous metals and alloys have been laser peened successfully, including titanium alloys, steels, aluminum alloys, nickel-base superalloys, cast irons, and a powder metallurgy iron alloy.
The material property enhancements are derived from the deep compressive residual surface stresses imparted by laser peening. Figure 3 shows an example of the deep compressive stresses achieved in two titanium alloys versus the shallower compressive stress profiles when conventional shot peening was used. Stress profiles were determined by standard X-ray diffraction measurements. The compressive residual stresses produced by laser peening extend in excess of 1.0 mm deep into the surface, whereas the compressive stresses for shot peened samples are present to a depth of about 0.2 mm.
Fatigue
The key benefits achieved in most applications with laser peening are significant increases in fatigue life and fatigue strength. The most dramatic increases in fatigue strength are achievable in thin sections for through-the-thickness cracks propagating into the structure from a stress concentration associated with an edge, be it a hole, notch, corner, inclusion or other feature. Substantial increases in fatigue strength are also achieved in thicker structures laser peened on a single surface in the area of a stress riser or stress concentration. Figure 4 shows a comparison of fatigue properties for 7075-T7351 aluminum specimens subjected to laser peening and shot peening. The notched fatigue specimens were tested in 3-point bending, using test conditions of R=0.1 and Kt=1.68. The data illustrate the typical fatigue enhancement of laser peened parts, including a 30-50 percent increase in notched fatigue strength and an increase in fatigue life of about an order of magnitude.
Production Applications
Figure 5 shows the application of the LaserPeen® (Trademark of LSP Technologies, Inc.) process to an integrally bladed rotor used in Pratt & Whitney's F119-PW-100 engine for the F/A-22 Raptor. In addition, laser peening has also improved fretting fatigue and stress corrosion cracking resistance in production parts.
Summary
Laser peening is used to provide additional fatigue enhancement to those areas on the components where the traditional broad area coverage methods are not sufficient. These are typically in high stress fillet areas or the edges of fan and compressor blades. Laser peening can be used to augment the traditional surface enhancement methods in areas that require deeper compressive residual stresses to improved fatigue strength.
The Authors:
David W. Sokol, Director of Research, Extension 414
Richard D. Tenaglia, Development Manager, Extension 417
David F. Lahrman, Director, Business Development, Extension 244
For Information:
LSP Technologies Inc.
6145 Scherers Place, Dublin Ohio 43016, USA
Tel. +1.614.718-3000, Fax +1.614.718-3007
www.lspt.com


