E-Archive
Cover Page
in Vol. 6 - May Issue - Year 2005
Automated Residual Stress Mapping – Quantitative Data On Real Parts

Figure 1

Figure 2

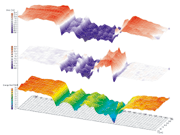
Figure 3 - Example of a residual stress multi-map with a third

Figure 4
The residual stresses present in manufactured components, assemblies and structures can significantly improve or diminish their useful life. Proto Mfg. Ltd. has been helping companies for over 20 years with the measurement of residual stresses in the laboratory, on the shop floor and in the field by providing both sales of standard and custom instrumentation as well as measurement services.
Meeting Today’s Process Control Challenge in a Competitive Environment
With consumer demand for increased quality and value, the pressure to improve and optimize process control has become an increasingly more difficult challenge. Ultimately, the pursuit of higher quality at lower cost through continuously improved process control requires hard numerical data. Engineers can no longer afford to rely on subjective, associative or qualitative data alone; sound “go/no go” engineering decisions require quantitative data on the actual part in question. Advanced XRD (x-ray diffraction) mapping techniques can be used to provide the critical, quantitative data required to: a) identify and quantify gradients in a component, b) optimize and validate processes that may be life enhancing, c) control or eliminate practices that may be life limiting, and d) monitor processes and product quality on an ongoing basis.
Gradients are a Fact of Life
In almost every step of manufacturing, components are subject to thermal and mechanical treatments that change their physical state. In general, the effects on the physical state, and the associated gradients created in a component for any given manufacturing step, will be localized to a specific region of the component and will be very much process dependant. For example, when casting a component, thinner and thicker sections will cool at different rates, as do regions near the surface or near cooling holes, thus creating residual stress and microstructure gradients within the casting. Residual stress gradients are invariably created in welds as a result of the differential cooling and temperature gradients inherent to the process. The effects of shot peening may vary on the surface of a component and with depth into the component. Furthermore, when applying rolling or burnishing processes, the amount of resultant residual stress and texture may vary from processed to unprocessed locations and through transition zones where the tool is loaded/unloaded. Directionally solidified components may have a well controlled primary grain orientation, but the secondary grain orientation may not be controlled and may vary substantially over the length of the part. Gradients are a fact of life: quantitatively characterizing the residual stress or texture at one location will not necessarily tell you what you need to know about a component at all locations. Thorough and accurate characterization of physical parameters requires mapping the entire area of interest on the surface and as a function of depth to get a full 3D picture of the physical state of a component. This can be accomplished quite conveniently and rapidly by applying XRD mapping techniques.
Portable Automated Mapping (patented)
With recent advances in detector technology, large maps composed of hundreds of individual measurement points can now be collected easily and rapidly. With the advent of portable mapping technology, much larger components can be mapped with XRD techniques in the field (see Figure 1). This mapping technology has been applied with great success to XRD analysis of phase content, texture, grain orientation, residual stress, coating thickness and the associated gradients for each over an area of interest and as a function of depth, both in the lab and in the field
Since most real world parts have physical features that are not necessarily flat, and since XRD analysis is sensitive to the instrument standoff distance to the measurement point, the surface contours need to be mapped prior to collecting XRD map data. This problem has been solved by a contour “Teach” feature that automatically maps the topography of the component over the mapping range (like a CMM). From this contour map (see Figure 2), the precise position in space can be determined for each measurement point in the map. The angle of tangency is then calculated so that the XRD instrument can be referenced to the normal stress? of the surface at each measurement point, thus ensuring high accuracy measurements at all points composing the map.
Display and Analysis - Stacked Multi-Maps and Map Algebra (patent pending)
To determine the precise effects of a given manufacturing process over an area of a component, one may wish to map the part prior to a process being applied to establish a baseline. Once the manufacturing process has been applied, the same component can then be mapped again at the same locations. The effects of the process can then be viewed by stacking the maps in multi-map format. A third “difference” stacked map can then be added and plotted by applying map algebra to the first two maps to see what has changed (see Figure 3). Numerous map results can be plotted for the same XRD data set including: residual normal stress, residual shear stress, peak intensity, intensity ratio, FWHM, integrated intensity, integral breadth, d-spacing and 2? as well as the surface contour data set (see Figure 4).
Summary
XRD mapping techniques have proven to be an invaluable tool and are currently being applied successfully in the pursuit of reduced cost and higher quality manufacturing in applications across numerous sectors including: automotive, aerospace and power generation.
For information:
Proto Mfg. Ltd., 2175 Solar Cr.
Oldcastle, Ontario, Canada, N0R 1L0
Tel: +1.519.737 6330, Fax +1.519.737 1692
E-mail: proto@protoxrd.com, www.protoxrd.com


