E-Archive
Cover Page
in Vol. 14 - July Issue - Year 2013
Measuring Residual Stress

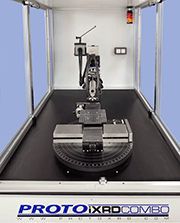
Multiaxis residual stress diffractometer


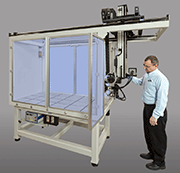
iXRD gantry for measuring residual stress

Large LXRD gantry system for measuring residual stress

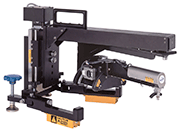
Portable iXRD for measuring residual stress
Measuring residual stress is all in a day’s work at Proto Manufacturing. One could almost claim that every day’s work at Proto Manufacturing is about measuring residual stress!
Introduction
Proto Manufacturing Limited was founded in 1967 by Erhard Brauss, as a manufacturer of parts serving the growing automobile industry in the Windsor-Detroit area spanning the Canada-USA border. The Company’s clients demanded rigorous inspection of their products, and Proto Manufacturing took an interest in the advanced NDT techniques of the day, developing and providing automated and integrated NDT systems to the automotive industry as well as manufactured components. In the early 1980s, the Company learned of X-ray diffraction as a means of measuring residual stress in the surfaces of metallic parts and recognized its importance as an NDT method to evaluate manufactured surfaces.
X-ray Diffraction For NDT
X-rays were first observed by Wilhelm Röntgen in 1895 as a by-product of experiments using 'cathode rays', and their medical uses were immediately apparent. The nature of X-rays was not recognised until 1912, when Max von Laue simultaneously demonstrated their wave-like properties and the ordered internal structure of crystalline materials by recording the X-ray diffraction pattern of a crystal on a photographic plate. The following year, William Laurence Bragg and his father, William Henry Bragg, clarified the interaction between X-rays and crystals, formulating a description of the diffraction process, Bragg’s Law. These three contributions to Physics were each recognized with Nobel Prizes, with Röntgen’s being the first Prize for Physics, awarded in 1901.
Von Laue’s method allows the spatial orientation of a crystal structure to be determined, and the distance between layers of atoms in crystals can be calculated using the Bragg Equation. X-ray diffraction was first used to measure residual stress in 1925, using the distances between layers of atoms as a strain gauge. Photographic plates were the only means of recording the diffraction patterns, so the method could only be applied to materials with well-defined diffraction lines.
The early 1950s saw a significant advance in X-ray instrumentation, the X-ray diffractometer, which could digitally record the shape of the diffraction peaks, one data point at a time. For the first time, the positions of the peaks could be calculated by curve-fitting methods. The diffractometer extended the range of materials that could be measured to include those with inherently broad diffraction lines, such as the hardened steels.
In the 1970s and 1980s, a new family of detectors for X-rays was developed. The 'Position Sensitive' detectors allowed simultaneous recording over a range of diffraction angles wide enough to encompass an entire diffraction peak and its immediate background. It was no longer necessary to mechanically step the diffractometer through the peak to record the profile. The development of smaller, lighter, position-sensitive detectors would allow X-ray residual stress measurement to be taken out of the research laboratory and used for NDT and process control in the industrial laboratory, on the manufacturing shop floor, and for on-site investigation of machines and structures in service. Proto Manufacturing was at the leading edge of this transition.
Surface Improvement Using Residual Stress
Residual stress influences the manufacturing and service life of components, yet is rarely recognized until something unexpected occurs. For example: heat treatment stresses may cause distortion during machining, a local tensile residual stress promotes stress corrosion cracking without an applied load, or a cleaning process generates a compressive residual stress, and the affected parts give unusually long fatigue lives.
The automotive industry played a leading role in recognizing residual stress as an important surface characteristic. Responding to unpredictable fatigue lives in batches of valve springs, it was noticed that springs purchased from a supplier who used shot blasting to remove heat treatment stains lasted longer and were more consistent than those from suppliers who used abrasive or chemical cleaning techniques. Not surprisingly, shot blasting was soon in use at all the suppliers.
In 1939, J O Almen, working at the Buick Motor Company, introduced a procedure to monitor the intensity of the shot stream used to blast the surface of the valve springs. With the addition of robust process control, shot blasting became shot peening, and the purpose changed from cleaning to enhancing surface properties. The technique bearing his name is still used throughout the peening industry to establish and monitor peening intensity.
While maintaining control of the media stream is essential in all peening and blasting operations, a different technique is needed to assess the effects of the specific peening process on the component being peened. Material properties and details of shape, size and access for the media stream are unlikely to be the same as those of the standard Almen strips being peened with steel shot, so the interactions will also be different. The range of possible interactions is further expanded when newly developed media such as glass, plastic and ceramic beads are included, or when the impact is not by a physical object, but the pulse of a laser beam, or a shock wave delivered in a water-jet. All of these sources of peening energy can be monitored using Almen’s technique. However, their effect on the component’s properties will depend on the details of the interaction between the material and the chosen medium.
Residual Stress Measurement As An NDT Method
Under the guidance of the founder’s son, Michael, Proto Manufacturing adopted the new technology as an NDT method. During the 1980s, they acquired skills and technologies to develop laboratory-based and portable X-ray diffraction systems capable of performing measurements on large, complex components and structures. Over the following decade, the company completed the transition from being a manufacturer of automotive components and automated NDT systems to being a world leader in residual stress measurement, and a leading supplier of measurement systems. Their close relationship with the automotive industry continues, as the industry pursues goals of improved reliability, reduced fuel consumption through lighter components, and lower manufacturing cost.
The automotive industry was, and remains, a powerful promoter of the method, although applications for X-ray residual stress measurement extend far beyond that industry. The aerospace industry in particular is driven towards the use of lighter materials and components in aircraft and their engines. At the same time, aircraft and their components are subject to vibratory stresses in addition to cyclic service loads. Cyclic and vibratory stresses in components can lead to fatigue-cracking if not properly understood and managed. Just as the fatigue life of automotive valve springs is improved by shot peening, residual stress can play a key role in safely extending aerospace component life and improving reliability in service.
The materials used in the aerospace industry are diverse. Aluminium and magnesium alloys are used for their light weight. Steels offer strength and stainless steel offers corrosion resistance. Titanium alloys are used for their strength-to-weight ratio and intermediate temperature mechanical properties, while nickel- and cobalt-based alloys are used in the hottest regions of aircraft engines. All of these materials are candidates for many types of NDT inspections during development and manufacturing, including residual stress measurement. For the aerospace industry and others requiring outstanding reliability, the need for sophisticated NDT inspection extends throughout the life of the product. Residual stress measurement on parts at overhaul can reduce lifetime operating costs in selected applications of gas turbine engines by contributing to a 'retirement-for-cause' philosophy where the traditional approach has been to retire components after a predetermined life.
Proto Manufacturing’s Current Activity
Proto’s very active laboratories in Canada, the USA and most recently, Japan, operate 22 residual stress measurement systems. These diverse machines generate hands-on expertise and application knowledge to incorporate into future products. The company has continued to develop methods for specific applications, including automated stress mapping systems which can be taught the 3D coordinates of locations at which measurements are required, systems which will operate deep inside pipelines, measuring stresses around critical welded joints, and miniature systems to measure residual stress inside pipes and machined holes.
In addition to specialized systems and measurement services, Proto offers a wide range of X-ray systems for Residual Stress measurement. Each machine has a goniometer, the working head of the machine, which manipulates the X-ray beam and detectors so that appropriate data can be collected from the sample. Goniometers of varying complexity are available, from those performing simple measurements, to the multi-directional measurements needed to calculate the principal stresses in the measured zone. Multiple axes of motion are driven by stepping motors controlled by a computer whose software also manipulates data and calculates the results of measurements. Raw data from the detectors is saved, so that alternate calculation methods can be applied to the data later.
Laboratory-based systems are contained in one of a range of enclosures to absorb scattered radiation, and have working areas to accommodate objects up to about 30 centimeters diameter in the smallest, to the largest commercially available system, in which the goniometer is mounted on a gantry robot to provide access to any point on large components. Laboratory systems use powerful X-ray tubes and heavy-duty power supplies and cooling systems to generate high-count rates and hence faster measurements. Their rigid enclosures can support a variety of automated stages to manipulate the test material in concert with the motion of the goniometer.
If the test material cannot be brought to the X-ray machine, Proto has a range of systems designed for field use. Weighing as little as 14 kilos, and self-contained, the system can be operated from a portable generator. Safety for the operator is provided by establishing a perimeter around the site of the measurements. While limited power is available from the miniature X-ray tubes used in these machines, reduced working distance compensates for lower X-ray output, and measurement times remain acceptably short.
Combining the features of the portable system with the convenience and safety features of the laboratory systems, a combined system allows a portable system to be used within an enclosure, and demounted for field use when necessary. The same X-ray systems are well suited to the measurement of Retained Austenite in heat-treated steels. The presence of Austenite in an otherwise Martensitic steel can lead to dimensional instability and unpredictable properties in components.
Over the past 10 years, Proto has developed a range of X-ray tubes, primarily for their own use, but also available to customers as replacements for other commercially available tubes. Proto can also design and build unique tubes for customers' specific applications. Development of these x-ray tubes has given Proto more flexibility in the designs and miniaturization of their own systems.
Proto has taken residual stress measurement equipment from a complex, difficult-to-use research instrument into an easy-to-operate, flexible and robust tool for industry to characterize their surface-enhanced manufactured products.
For Information:
Proto Manufacturing Ltd.
2175 Solar Crescent, Oldcastle, Ontario
Canada, N0R 1L0
Tel. +1.519.737 6330
Fax +1.519.737 1692
E-mail: proto@protoxrd.com
www.protoxrd.com


