E-Archive
Cover Page
in Vol. 19 - January Issue - Year 2018
Quality Control Of Shot Peening With X-Ray Diffraction
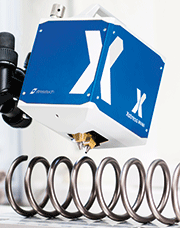
Xstress Mini measuring residual stresses on a shot peened spring
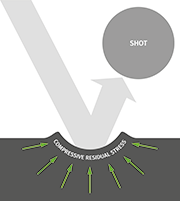
Illustration of the residual stresses induced by shot peening
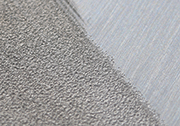
Visible difference between shot peened (left) and machined surface (right)

Accelerated electrons remove inner shell electrons from target material atoms. When this vacancy is filled characteristic X-rays specific to the target material are emitted.
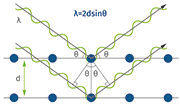
Illustration of the Bragg´s law, which describes X-ray diffraction from crystal lattice planes

Uniform strain shifts the diffraction peak. Nonuniform strain can alter both the peak shape and position.

Residual stresses are determined from the diffraction data by calculating the strain from the diffraction peak positions
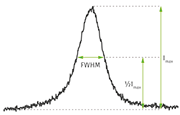
The width of the diffracted peak is affected by micro-stresses and imperfections in the crystal structure (i.e. dislocations, plastic deformation, etc.)
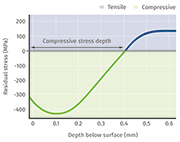
A typical shot peening stress depth profile
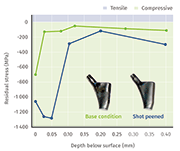
A Titanium hip joint´s residual stress depth profile before and after the shot peening process
Stresstech Oy, a Finland based company with subsidiaries in Germany, USA and India, has more than 30 years' experience providing non-destructive testing (NDT) solutions for process control and quality inspection to the automotive, aerospace, machine, and energy industries as well as universities and research institutes. Stresstech's product line ranges from handheld units to fully automated inspection systems using x-ray diffraction, Barkhausen Noise Analysis, or ESPI hole-drilling (Electronic Speckle Pattern Interferometry) technologies to measure residual stress, retained austenite contents, grinding burn among other parameters.
Stresstech's latest product, the Xstress Mini, is a compact and lightweight x-ray diffractometer that can be used for fast inspection of various shot-peened components.
Shot Peening
Shot peening is a cold working process in which the surface of a component is peened with small spherical balls called shots. The process creates plastic deformation on the surface, relieves surface tensile stresses, and induces beneficial compressive residual stresses.
Inducing compressive residual stresses on a component’s surface increases the resistance to fatigue failures and stress corrosion cracking (SCC) thus lengthening the lifetime of the component. Shot peening is widely applied to any components that require high cyclic fatigue life and strength such as springs, gears, camshafts, crankshafts and turbine blades.
Quality control of the shot peening process by residual stress measurement is advisable. A common technique for measuring residual stresses of shot peened workpieces is x-ray diffraction.
X-ray Diffraction
X-rays are electromagnetic radiation with a shorter wavelength than visible light. They can probe the inter-atomic distance in crystalline materials at a depth of 1 to 10 microns below the surface. Assuming a planar stress state and using the inter-atomic spacing as the ultimate gage length, it is possible to measure absolute stress values without the need for prior calibration with unstressed samples.
X-ray tubes consisting of a tungsten filament (cathode) and a target material (anode) are commonly used as x-ray source. A high accelerating voltage (25 kV to 60 kV) applied between the cathode and the anode will trigger the creation of an electron beam. As this electron beam collides with the target material, it removes an electron from the atom’s lower shell, leaving a hole. A higher shell electron will drop in to fill that hole, generating characteristic Kα and Kβ x-rays, specific to the anode's target material, along with the background Bremsstrahlung, x-rays. The almost monochromatic characteristic radiation is used in the x-ray diffraction method.
Residual Stress Determination with X-ray Diffraction
Bragg's law describes x-ray diffraction from crystal lattice planes. In a stressed material, the wavelength of the x-ray (λ) is known, the distance between atomic planes (d) is unknown and the diffractions are observed at angles (θ). Stress causes small changes in d and shifts the diffraction angle. Bragg´s law assumes incoming and diffracted waves to be in phase and undergoing constructive interference.
Residual stresses are determined from the diffraction data by calculating the strain from the diffraction peak positions. Any stress, including applied or residual stresses, induces a strain that corresponds to changes in lattice spacing. In practice, a metal powder with no stress is measured first to set the angular scale of the detectors for a certain material. Stress is then calculated by measuring lattice distance with multiple tilt angles and plotting the results as d vs sin²χ graph, where d is the measured lattice spacing and χ is the tilt angle.
The residual stresses can be determined from the slope of this d vs. sin²χ graph. Measurements are usually fast, lasting from seconds to few minutes. Irradiated area size affects the measurement time; using a larger collimator reduces the needed time to make measurements.
Stress calculation is affected by material based parameters such as differences in lattice parameters, precipitations, interstitial occupation and micro-stresses. In a poly-crystalline structure with disordered crystals at the grain boundaries, precipitations and lattice defects, the diffraction line widens and forms a Gaussian-like peak.
The width of the peak is measured as Full Width at Half Maximum (FWHM), which illustrates micro stresses and/or hardness and plastic deformation; typically, values increases with increasing hardness.
Residual Stress Measurement with X-Ray Diffraction
X-ray diffraction (XRD) is a well-established and accurate method to investigate the residual stress levels on the surface layers of crystalline materials. X-ray diffraction for residual stress measurements is relatively cost-effective and widely available with mini, portable, stationary and even robotic diffractometers for both in situ and laboratory testing. XRD measurement is useful for stress analysis when the following conditions are met:
• Material must have a crystalline structure
• Material should have small grains
• Material elastic constant needs to be known
Non-destructive measurement depth for steel and aluminium is few to tens of micrometers below the surface. However, residual stresses are rarely completely described by a surface measurement alone. Shot peening generates a residual stress state that varies with depth. To completely characterize the generated residual stress depth profile electro-polishing is used to expose a new surface to be measured. By using electro-polishing and successive measurements an analysis depth down to 1 mm can be reached. With the combination of grinding and electropolishing, the analysis depth can be extended down to 5 mm.
Residual Stress Measurements with Xstress Mini
Xstress Mini is the smallest, most compact and lightweight x-ray diffraction analyser in Stresstech's product line. This single unit is easily portable and allows fast residual stress measurements in various applications both at the production line or on-site.
Xstress Mini offers all features of a full-scale x-ray diffractometer while being air-cooled and requiring minimum to no maintenance. Stresstech's XTronic software can be installed on a laptop for fast and easy data acquisition and delivery of measurement results.
Xstress Mini with Cr x-ray tube measures shot peening residual stresses in χ mode by exposing x-rays from two collimators and by detecting the diffracted x-rays with two position-sensitive NMOS linear image sensors. Due to the optimized geometry of the unit and the single irradiation operation, data acquisition times of less than 10 seconds can be achieved. Orientation sensors and an integrated laser distance meter to set the correct height makes the setup of the unit fast and convenient – out of the box to residual stress data in less than 5 minutes.
Xstress Mini is safe for use as the x-ray tube power is low. If a movement is detected or the distance to the object under investigation changes during the measurement, it will automatically shut itself down. The unit can also be integrated into a safety enclosure, which can feature a safety interlock and signal light tower.
Application examples for Shot Peening verification
Case-1: Residual Stress Measurements of Springs After Shot Peening
Springs are made of steels with a high-yield strength that allows storage of mechanical energy. They use this energy to return the product to its original form after a load condition. There are many types of springs such as leaf, coil and torsion types used in cars and trucks. To improve the fatigue strength or durability when manufacturing springs, shot peening is the typical surface treatment that is used. The induced shot peening compressive residual stresses need to be measured preferably on-site, next to the peening machine or even in-line. Almen intensity measurements are commonly used to analyse the shot peening process; however, these measurements do not provide any residual stress value. In these cases, x-ray diffraction is used to measure the residual stress values. Xstress Mini can provide the residual stress and Full Width at Half-Maximum (FWHM) profiles for shot peening process validation.
A typical shot peening stress depth profile is given below. In this example, over 800 MPa of compressive residual stress is induced on the subsurface layers of the component. Through the depth, changes in the stress direction and values are confirmed by x-ray diffraction.
Case-2: Residual Stress Measurements of Titanium Hip Joints after Shot Peening
During a hip replacement surgery the hip joint, or acetablulofemoral joint, is replaced by a prosthetic implant to support the damaged original bone structure. The titanium hip joint’s corrosion fatigue strength can be increased by a shot peening process that also includes a chemical cleaning to remove the contaminants that would affect the acceptance of implant by the body.
The graph shows a Titanium hip joint's residual stress depth profile before and after the shot peening process. The process is applied to improve the hip joint's durability by creating higher compressive residual stresses on the surface and subsurface layers. The after-process graph shows that the aim is achieved.
Measurement Service
As a market leader in providing residual stress solutions, Stresstech also operates accredited laboratories (ISO/IEC 17025:2005 Accredited Measurement Laboratory (FINAS T294)) in Finland, USA and Germany for residual stress and retained austenite measurements with x-ray diffraction method.
Xstress Mini, as well as other Xstress Systems, is available for on-site residual stress measurements. For your convenience, Stresstech’s experts can make any residual stress measurement for you at your site or in any of our three measurement laboratories.
For Information:
Stresstech Oy
Tikkutehtaantie 1
40800 Vaajakoski, Finland
Tel. +358.14.333 000
E-mail: info@stresstech.com
www.stresstech.com


