E-Archive
Good Vibrations
in Vol. 26 - September Issue - Year 2025
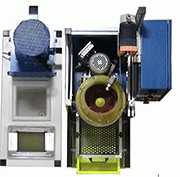
Automation for Deburring and Surface Preparation
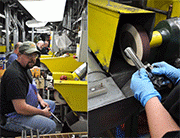
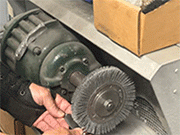
Old-School Polishing Department
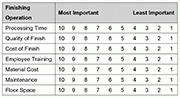
Chart 1
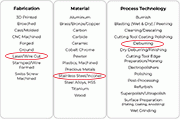
Chart 2: Example circled
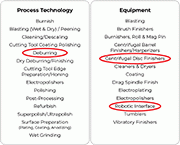
Chart 3: Example circled
Start from a hand finish
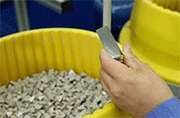
To mass finish
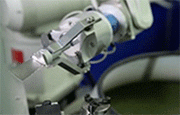
to robotic

To lean
to Cellular
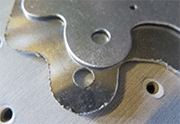
As machined; Finished
I. Introduction
Manufacturers continue to invest in optimizing machining operations—improving cutter designs, refining programs, and integrating robotics for part handling. Yet one critical step is often overlooked: deburring, polishing, and other surface preparation tasks, collectively known as post-processing.
Whether a part is intended for performance or appearance, surface quality matters. Across industries, post-processing is essential—but rarely standardized. Why? Because there’s no single solution that applies across all materials, geometries, and production methods.
In this article, we’ll explore how to approach automation in post-processing.
We'll outline common pitfalls, steps for aligning your team, and real-world examples—including one that helped shape the modern finishing standard for medical implants. Following the steps outlined in this article is important to effectively guide the process of automation.
II. Have a Team Meeting
Build the right team from the start. Too often, finishing automation is handed off to a single engineer or facilities manager—tasked with modernizing a hand operation or outdated finishing cell. This is typically called automation. The expectation? Push a button and receive fully deburred, cleaned, and polished parts, ready to ship. Whoa, put the brakes on! Because it’s rarely that simple.
Involve All Company Departments
It’s important to start a chain of communication with team members from each segment of the organization. The entire workforce, operating in unison, defines what is commonly referred to as Company Culture.
Engage Team Members From:
• Administration
• Accounting
• Engineering
• Facilities
• Shop Floor
A company-wide Kaizen or brainstorming session can be a great starting point.
Know Your Company Culture
Considering your company culture is an important part of ensuring a successful automation process—not only in its design to suit your needs, but also during its implementation. If the entire team is not involved in the process, we have seen many instances where automation efforts failed due to a lack of workforce investment in its success.
Use the chart 1 below to rate what matters most for your finishing operation. This will help define trade-offs when choosing an automation path.
Define Your Current State
Before selecting any automation equipment, you need to baseline your current process. Gather the following data:
• Part mix: What geometries, sizes, and quantities are you finishing?
• Current process: What steps are performed now, and by whom?
• Labor costs: How many hours per day/week are spent finishing?
• Consumables & tooling: Annual spend on media, abrasives, or brushes?
• Skill pool: What capabilities exist internally now? What will be needed in the future?
• Production output: Current vs. projected demand
Gather the available data for the current manufacturing costs of labor, rejects/reworks, floor space, maintenance, and supplies. Develop both a high and low budget estimate, along with an ROI that is acceptable to corporate.
Defining Automation Parameters to Suit Your Budget, Culture, and Product
Not every solution needs to be lights-out. Begin by identifying a degree of automation that:
• Improves consistency and/or throughput
• Fits your company culture and budget
• Leaves room for future upgrades
Evaluate the chart 2 to identify categories that align with your process. Try to cross-link the columns to help define your project parameters.
Select Your Automation Methods
Your Engineering department should now take over and analyze what "automation" means for your specific production requirements. The engineers’ concept may have evolved based on all the input gathered from the team. Here are some general concepts to help guide your decision. Common options include:
• Mass Finishing Systems: Vibratory, centrifugal, or drag finishing
• Lean or One-Piece Flow: Simple manual-to-automated cell upgrades
• Robotic Assist: Supportive tooling for belt sanding, buffing, etc.
• Cellular Workflows: Integrated with machining takt times
Now evaluate the chart 3 for possible matches of equipment types suitable for your process. Try to cross-link the columns to define the project parameters.
III. Find the Right Partner to Help Choose a System
It is very important to partner with a supplier who understands both manufacturing and finishing in order to help you select the right automation solution that aligns with your company culture. This partnership enables what we call a feedback loop, which may influence your final choice of finishing procedures.
Choose a Process:
It’s important to recognize that there may be multiple process technologies capable of solving your finishing challenge—and each comes with a different automation approach.
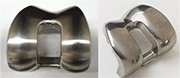
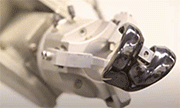
IV. Case Study: Femoral Implant Automation
Challenge:
A medical device company needed to finish femoral implants—complex, contoured components used in hip replacements. These parts require a smooth, polished finish across all surfaces to meet stringent implant standards.
Initial Approach:
The company used a manual belt sanding and buffing process. To automate, they added robotic arms programmed to replicate hand movements. However, the robots couldn’t adapt to the natural variation between parts.
• Result: 40% reject rate
• Added floor space: +500%
• Net gain in throughput: None
New Solution (Bel Air Finishing):
The team developed a drag finishing process tailored to femoral implants. This method utilized specialized media capable of accessing all contours of the part in three dimensions, enabling consistent finishing across batches.
The result was:
• Higher throughput
• Dramatically lower reject rates
• Smaller footprint
• Worldwide adoption in orthopedic manufacturing
This same process has since evolved to include reverse drag finishing and 5-axis automation for new coated implant materials.
V. Measure Results (Old-Style Manual vs. New Automation)
Data is key. How can the success of a new automation system be measured? It is essential to collect data that aligns with company culture, choose a defined time period, evaluate the results, apply lessons learned, and determine whether to refine the current process or shift focus to another production project.
Key metrics to track:
• Labor hours per finished part
• Reject/rework rates
• Cost per unit
• Floor space savings
• Employee upskilling
VI. Final Considerations
Think Long-Term:
• Scalability: Can the system adapt to future output requirements?
• Redundancy: Is there a backup plan for maintenance downtime?
• Support: Will the team handle internal maintenance, or is a service contract necessary?
VII. Closing Thoughts
Automation doesn’t have to mean complexity. With the right planning, the right partners, and a clear understanding of the current process, a manual bottleneck can be transformed into a competitive advantage.
Whether it’s a femoral implant, an aerospace bracket, or a 3D-printed part—finishing matters. And when done right, automated finishing not only saves time but also improves consistency, safety, and quality.
Good Vibrations
by Steve Alviti Sr
Contributing Editor MFN and
President and Owner of Bel Air Finishing Supply Corporation
E-mail: salviti@belairfinishing.com